
Filelink is a Thunderbird feature that makes it easy for users to upload large attachments to web-based storage services such as Hightail.
This document explains how to extend Thunderbird to support additional web-based storage services.
nsIMsgCloudFileProvider
Filelink storage providers must implement the nsIMsgCloudFileProvider interface. The Hightail implementation is a great place to look for examples and inspiration.
The nsIMsgCloudFileProvider implementation must be registered as a component. If the provider is being merged into the comm-central code repository (and thus added to the official Thunderbird build), you must also add the components to the cloudfile/cloudFileComponents.manifest, cloudfile/jar.mn, and installer/package-manifest.in.
If the nsIMsgCloudFileProvider is being created as part of an add-on, the add-on must register the component in chrome.manifest. Also, you must add the component's contract ID to the "cloud-file" category. See cloudfile/cloudFileComponents.manifest for an example, as well as this document on chrome.manifest files.
The Account Setup Dialog
The account setup dialog allows the user to select what account type they would like to create from a menulist.
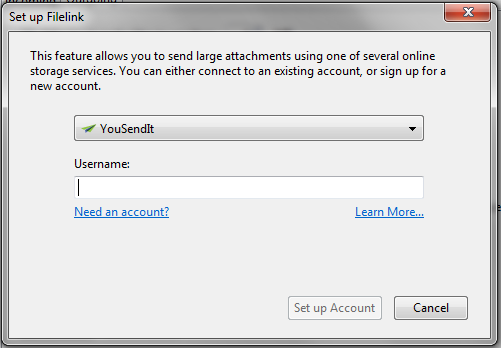
Some providers require Thunderbird to do very little in order to connect a user to their account. Other providers however may require the user to fill in additional details in order to connect to the service. Hightail, for example, requires a username and password. Other services may require the user to fill in a server string or port number.
A provider implementation can choose what information it gets from the user from the setup dialog by pointing the settingsURL attribute of their nsIMsgCloudFileProvider implementation to a chrome URL for an XHTML page that contains a form with the extra information. That URL is then loaded into an IFrame directly beneath the provider menulist.
Custom settings fields
To handle custom settings, the settings XHTML page should contain a form with the id "provider-form", with its onsubmit attribute set to "return false;".
Example:
<form id="provider-form" onsubmit="return false;">
  <label for="username">Username:</label>
  <input id="username" type="text" required="true" />
  <label for="server">Server:</label>
  <input id="server" type="text" required="true" />
  <label for="port">Port:</label>
  <input id="port" pattern="[0-9]+" required="true" />
</form>
The form is expected to use HTML5 form validation. For each input event, the checkValidity method of the form is automatically called. The button to set up the account will only become enabled once the checkValidity method for the form returns true.
Saving custom settings in preferences
Custom settings for a provider are saved using the Preferences API.
Saving the preferences is handled automatically by the dialog code. Providers need only provide an extraArgs function in the IFrame content which returns an object specifying the name, type, and value to save.
The format for the returned object is:
{
  FIELD_NAME: {type: FIELD_TYPE, value: FIELD_VALUE}
}
Where FIELD_TYPE is "int", "bool", or "char".
For example, the Hightail implementation provides the following function:
function extraArgs() {
  var usernameValue = document.getElementById("username").value;
  return {
    "username": {type: "char", value: usernameValue},
  };
}
In this example, the username value is read from the input, and then the specially-crafted object is returned. Once this is done, the field is accessible from within the implementation via the Preferences API using the key mail.cloud_files.accounts.ACCOUNT_KEY.username where ACCOUNT_KEY is the value passed into the implementations init function.
The Hightail settings.xhtml and settings.js file have examples of this.
Management interface
Once an account has been created, it is manageable from within the Preferences dialog, in the Attachment pane, in the Outgoing tab.
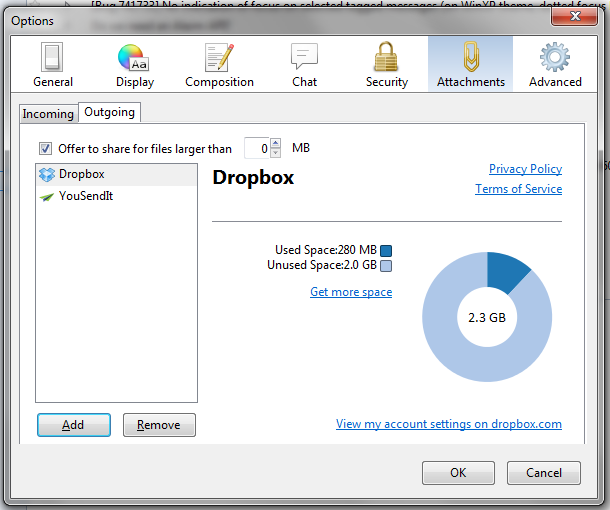
The content to the right of the menulist is an IFrame, pointed at a URL read from the providers managementURL attribute, which should point to an XHTML page.
The XHTML page should have a function in the global scope called onLoadProvider. This function is called automatically once the DOM content is done loading, and is passed a single parameter - the provider instance whose data is being displayed.