
Deprecated in Firefox 29 and removed in Firefox 38.
Warning: this tutorial relies on the since-removed Widget API and no longer works with Firefox.
The widget API is deprecated from Firefox 29 onwards. Please see the ui module for replacements. In particular, for a simple button, try the action button or toggle button APIs, and for a more complex widget try the toolbar or sidebar APIs.
We'll use two objects to create annotations: a page-mod to find page elements that the user can annotate, and a panel for the user to enter the annotation text itself.
Selector page-mod
Selector content scripts
The content script for the selector page-mod uses jQuery to examine and manipulate the DOM.
Its main job is to maintain a matched element: this is the page element that is the current candidate for an annotation. The matched element is highlighted and has a click handler bound to it which sends a message to the main add-on code.
The selector page mod can be switched on and off using a message from the main add-on code. It is initially off:
var matchedElement = null;
var originalBgColor = null;
var active = false;

function resetMatchedElement() {
  if (matchedElement) {
    (matchedElement).css('background-color', originalBgColor);
    (matchedElement).unbind('click.annotator');
  }
}

self.on('message', function onMessage(activation) {
  active = activation;
  if (!active) {
    resetMatchedElement();
  }
});
This selector listens for occurrences of the jQuery mouseenter event.
When a mouseenter event is triggered the selector checks whether the element is eligible for annotation. An element is eligible if it, or one of its ancestors in the DOM tree, has an attribute named "id". The idea here is to make it more likely that the annotator will be able to identify annotated elements correctly later on.
If the page element is eligible for annotation, then the selector highlights that element and binds a click handler to it. The click handler sends a message called show back to the main add-on code. The show message contains: the URL for the page, the ID attribute value, and the text content of the page element.
$('*').mouseenter(function() {
  if (!active || $(this).hasClass('annotated')) {
    return;
  }
  resetMatchedElement();
  ancestor = $(this).closest("[id]");
  matchedElement = $(this).first();
  originalBgColor = $(matchedElement).css('background-color');
  $(matchedElement).css('background-color', 'yellow');
  $(matchedElement).bind('click.annotator', function(event) {
    event.stopPropagation();
    event.preventDefault();
    self.port.emit('show',
      [
        document.location.toString(),
        $(ancestor).attr("id"),
        $(matchedElement).text()
      ]
   );
  });
});
Conversely, the add-on resets the matched element on mouseout:
$('*').mouseout(function() {
  resetMatchedElement();
});
Save this code in a new file called selector.js in your add-on's data directory.
Because this code uses jQuery, you'll need to download that as well, and save it in data.
Updating main.js
Go back to main.js and add the code to create the selector into the main function:
var selector = pageMod.PageMod({
  include: ['*'],
  contentScriptWhen: 'ready',
  contentScriptFile: [data.url('jquery-1.4.2.min.js'),
                      data.url('selector.js')],
  onAttach: function(worker) {
    worker.postMessage(annotatorIsOn);
    selectors.push(worker);
    worker.port.on('show', function(data) {
      console.log(data);
    });
    worker.on('detach', function () {
      detachWorker(this, selectors);
    });
  }
});
Make sure the name you use to load jQuery matches the name of the jQuery version you downloaded.
The page-mod matches all pages, so each time the user loads a page the page-mod emits the attach event, which will call the listener function we've assigned to onAttach. The handler is passed a worker object. Each worker represents a channel of communication between the add-on code and any content scripts running in that particular page context. For a more detailed discussion of the way page-mod uses workers, see the page-mod documentation.
In the attach handler we do three things:
- send the content script a message with the current activation status
- add the worker to an array called
selectorsso we can send it messages later on - assign a message handler for messages from this worker. If the message is
showwe will just log the content for the time being. If the message isdetachwe remove the worker from theselectorsarray.
At the top of the file import the page-mod module and declare an array for the workers:
var pageMod = require('sdk/page-mod');
var selectors = [];
Add detachWorker():
function detachWorker(worker, workerArray) {
  var index = workerArray.indexOf(worker);
  if(index != -1) {
    workerArray.splice(index, 1);
  }
}
Edit toggleActivation() to notify the workers of a change in activation state:
function activateSelectors() {
  selectors.forEach(
    function (selector) {
      selector.postMessage(annotatorIsOn);
  });
}

function toggleActivation() {
  annotatorIsOn = !annotatorIsOn;
  activateSelectors();
  return annotatorIsOn;
}
We'll be using this URL in all our screenshots. Because cfx run doesn't preserve browsing history, if you want to play along it's worth taking a note of the URL.
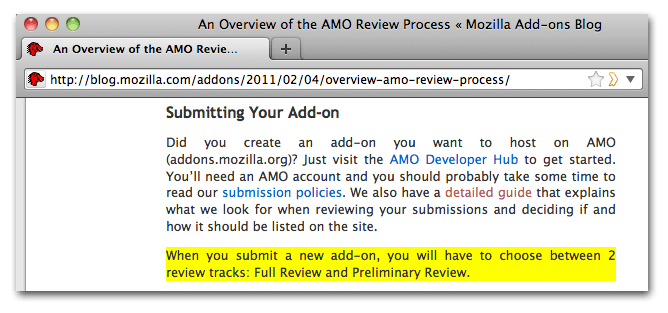
Save the file and execute cfx run again. Activate the annotator by clicking the widget and load a page: the screenshot below uses http://blog.mozilla.com/addons/2011/02/04/ overview-amo-review-process/. You should see the highlight appearing when you move the mouse over certain elements:
 Click on the highlight and you should see something like this in the console output:
  info: show
  info: http://blog.mozilla.com/addons/2011/02/04/overview-amo-review-process/,
  post-2249,When you submit a new add-on, you will have to choose between 2
  review tracks: Full Review and Preliminary Review.
Annotation editor panel
So far we have a page-mod that can highlight elements and send information about them to the main add-on code. Next we will create the editor panel, which enables the user to enter an annotation associated with the selected element.
We will supply the panel's content as an HTML file, and will also supply a content script to execute in the panel's context.
So create a subdirectory under data called editor. This will contain two files: the HTML content, and the content script.
Annotation editor HTML
The HTML is very simple:
<!DOCTYPE html PUBLIC "-//W3C//DTD XHTML 1.0 Strict//EN"
"http://www.w3.org/TR/xhtml1/DTD/xhtml1-strict.dtd">

<html xmlns="http://www.w3.org/1999/xhtml" xml:lang="en">
<head>
  <title>Annotation</title>
  <style type="text/css" media="all">
  body {
    font: 100% arial, helvetica, sans-serif;
    background-color: #F5F5F5;
  }
  textarea {
    width: 180px;
    height: 180px;
    margin: 10px;
    padding: 0px;
  }
  </style>

</head>

<body>

<textarea rows='10' cols='20' id='annotation-box'>
</textarea>

</body>

</html>
Save this inside data/editor as annotation-editor.html.
Annotation editor content script
In the corresponding content script we do two things:
- handle a message from the add-on code by giving the text area focus
- listen for the return key and when it is pressed, send the contents of the text area to the add-on.
Here's the code:
var textArea = document.getElementById('annotation-box');

textArea.onkeyup = function(event) {
  if (event.keyCode == 13) {
    self.postMessage(textArea.value);
    textArea.value = '';
  }
};

self.on('message', function() {
  var textArea = document.getElementById('annotation-box');
  textArea.value = '';
  textArea.focus();
});
Save this inside data/editor as annotation-editor.js.
Updating main.js Again
Now we'll update main.js again to create the editor and use it. First, import the panel module:
var panels = require('sdk/panel');Then add the following code to the main() function:
var annotationEditor = panels.Panel({
  width: 220,
  height: 220,
  contentURL: data.url('editor/annotation-editor.html'),
  contentScriptFile: data.url('editor/annotation-editor.js'),
  onMessage: function(annotationText) {
    if (annotationText) {
      console.log(this.annotationAnchor);
      console.log(annotationText);
    }
    annotationEditor.hide();
  },
  onShow: function() {
    this.postMessage('focus');
  }
});
We create the editor panel but don't show it. We will send the editor panel the focus message when it is shown, so it will give the text area focus. When the editor panel sends us its message we log the message and hide the panel.
The only thing left is to link the editor to the selector. So edit the message handler assigned to the selector so that on receiving the show message we assign the content of the message to the panel using a new property annotationAnchor, and show the panel:
var selector = pageMod.PageMod({
  include: ['*'],
  contentScriptWhen: 'ready',
  contentScriptFile: [data.url('jquery-1.4.2.min.js'),
                      data.url('selector.js')],
  onAttach: function(worker) {
    worker.postMessage(annotatorIsOn);
    selectors.push(worker);
    worker.port.on('show', function(data) {
      annotationEditor.annotationAnchor = data;
      annotationEditor.show();
    });
    worker.on('detach', function () {
      detachWorker(this, selectors);
    });
  }
});
Execute cfx run again, activate the annotator, move your mouse over an element and click the element when it is highlighted. You should see a panel with a text area for a note:
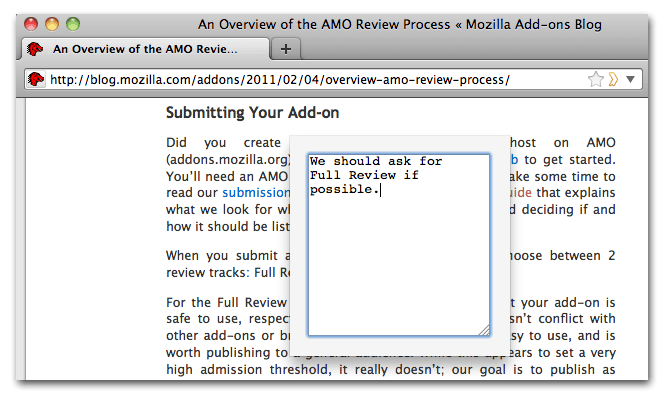 Enter the note and press the return key: you should see console output like this:
  info: http://blog.mozilla.com/addons/2011/02/04/overview-amo-review-process/,
  post-2249,When you submit a new add-on, you will have to choose between 2
  review tracks: Full Review and Preliminary Review.
  info: We should ask for Full Review if possible.
That's a complete annotation, and in the next section we'll deal with storing it.