
Getting the right tools
There are 3 tools that we think are essential for effective add-on development (or any kind of development, really): a source code editor, a source control system, and a build system.
In regards to code editing, there's no official Mozilla IDE. On the other hand, extensions use the same (or similar) languages that are used for web development, so most text editors and IDEs are up to the task. Most XUL tools and plugins you'll find online are merely templates that generate the folder structure for the project, and that's not much help.
We recommend Komodo Edit. It's free, open source, and cross-platform. It's based on the Mozilla XULRunner platform, so it has support for some of the particularities in Firefox extension development. Komodo Edit has automatic completion for XUL tags and attributes, and it supports Mozilla's CSS extensions (CSS values and properties beginning with "-moz"). It has an add-on system similar to the one in Firefox, and there are some Komodo extensions that provide additional help in extension development. That is more than what you can get with most other editors, so we recommend you to give it a try. All of our examples are handled with Komodo Edit, so if you see a .kpf or .komodoproject file in an example you download, this is a Komodo project file.
We recommend Git and GitHub for source control, but any decent software configuration management system will do.
To package XPI files, we use make. We chose make because this is the same system used by Mozilla to build Firefox, and it is available for all operating systems. make is a default tool in most UNIX-based systems. It can be installed on Mac OS X as part of the XCode Tools package, and on Windows with cygwin. In cygwin installations you'll have to explicitly check the make and zip utilities from the long list of packages to download and install.
Also make sure that make is in the executable system path. After setting up make, you should be able to open a command line window, run "make -ver", and get the installed version of make as output.
We recommend you set up make in your system, since our examples come with all the necessary files to build and install the resulting XPI using this tool. It will save you some packaging time. Or you can create an equivalent system using batch, Ant or whatever you prefer. Ultimately you can just compress the contents of the src directory using any zip or archive tool and get a similar result.
Build system
Let's start by downloading the project used to build the second version of Hello World, from the exercise in the last section.
Unzip the file anywhere you want. Inside the HelloWorld2 directory, you'll see two directories: bin and src. The bin directory should be empty. This is where all the resulting build files will be created, and where you'll find the extension XPI file once you get it to build.
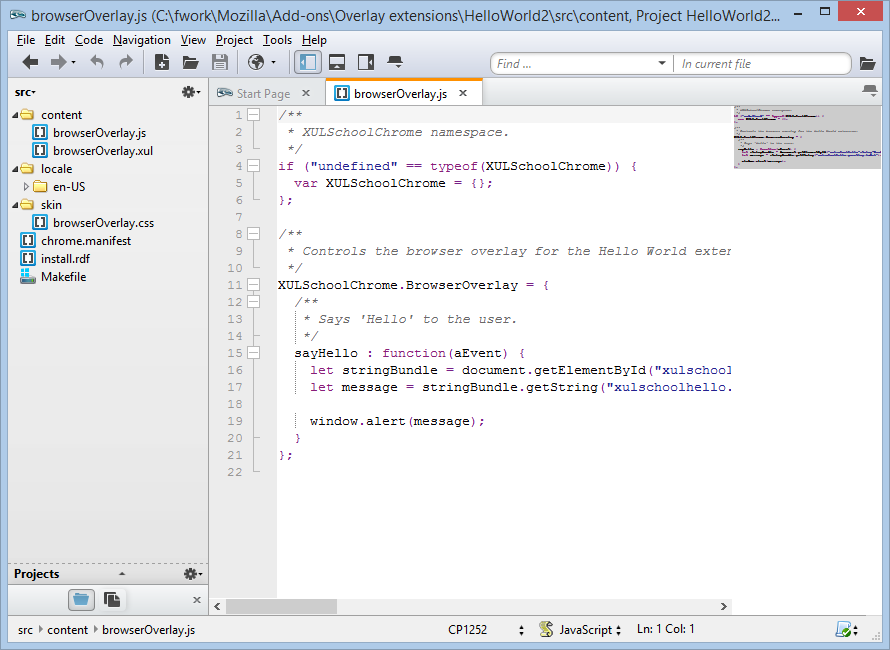
Open the project file (HelloWorld2.komodoproject) from the src directory in Komodo Edit. In the Projects tab you should be able to see the directory structure inside the src directory. This structure should be familiar, as it is almost identical to the unpacked XPI from the previous section.
The only notable additions is a file named Makefile under src. This is the file that make uses to build the XPI. You should take some time to read it and understand it, or at least identify the parts that you should change to get a project of your own going. This GNU Make Manual is a very good reference to get to know make and Makefiles.
In most cases you'll only need to change the first lines in Makefile. These define the extension name, the extension id (as specified in install.rdf) and the name of the profile directory where the extension will be installed during development and testing. More about this further ahead.
Let's try and build the XPI from the command line first. Open the command line program in your system and navigate to the src directory in your project. Run the following command:
make
That's it. If everything went well, you should see an output similar to this:
Creating XPI file.
  adding: install.rdf (deflated 50%)
  adding: chrome.manifest (deflated 50%)
  adding: content/browserOverlay.js (deflated 42%)
  adding: content/browserOverlay.xul (deflated 69%)
  adding: skin/browserOverlay.css (stored 0%)
  adding: locale/browserOverlay.dtd (deflated 52%)
  adding: locale/browserOverlay.properties (stored 0%)
Creating XPI file. Done!

Build finished successfully.
If you inspect the bin directory, you should see the xulschoolhello2.xpi file.
If you run make again, you'll only see the last line of the build process. That is because make can tell that the file in the bin directory is up to date, and nothing needs to be done. Making changes on source files will make make run the necessary steps to build the XPI again.
You can clean up the bin directory by just running the following command (again, from the src directory):
make clean
You can also run these commands from Komodo. Click on Tools > Run Command.... In the "Run" textbox you should type this:
bash -c "make"
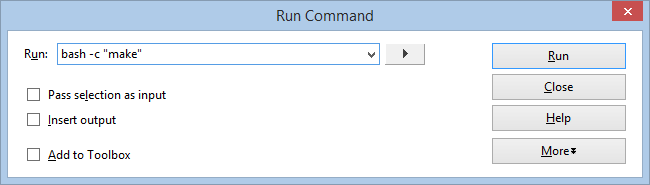
Or replace "make" with "make clean" for the clean command. The "bash -c" part forces Komodo to use bash, which for some reason can't be set properly as the default command shell. It isn't necessary to add this, but it's better so that it is consistent with the make command we'll see next.
In the "Start in" textbox you should choose %p (directory path of active project). If you don't see this textbox, click on the "More" button. You also have the option to save the command, by clicking on the "Add to Toolbox" checkbox. To see the Toolbox, click on View > Tabs > Toolbox, from the main menu. With that, you should now have a very easy way to build your XPI, by just double clicking on the created commands.
We can make it even better. Once you're testing and debugging your code, you'll find that constantly building and installing an XPI can be very tedious. This is the reason why we introduced "make install". This only works if your extension is already installed in a Firefox profile. Just like in the provided project, you need the add-on id and profile location set in the file Makefile. We use this information to locate the installation path of the extension and overwrite the installed files. If Firefox is open at the time you run "make install", you'll have to restart it in order to see the changes. It's still better than installing the XPI all over again.
You may need to alter the profile location in your Makefile. In order to set the profile location to the right value, you should read the support article on profiles, at the Mozilla Support site. We'll also delve deeper in this topic later on in this section.
To make "make install" work on non-Windows systems, you need an extra step. The install process requires using an environment variable called OSTYPE, which is not exported. Long story short, if you want to run it from a command line, you need to run:
export OSTYPE; make install
And in the command in Komodo, you should enter the following:
bash -c "export OSTYPE; make install"
The export command won't work correctly unless you use "bash -c".
Building IDL files
Some extensions require developing XPCOM components to add certain advanced functions. There's a section dedicated to XPCOM in this tutorial, but we'll briefly discuss the impact it has on building the extension. You can skip this section and keep it present as a reference in case you do need to use XPCOM in your project.
XPCOM interfaces are defined using IDL files. These are text files that define the attributes and methods in one or more interfaces. These IDL files are compiled into binary form and included in the extension as XPT files.
To compile an IDL file to XPT, you need a command line tool called xpidl. This tool is included in the Mozilla Gecko SDK. If you need to compile IDLs, go to the SDK page and download a compiled version for your system. Also note any prerequisites you may need. If your system is not listed in the supported builds, you'll have to build the SDK yourself from the Mozilla source. Good luck with that.
You should also set up your environment so that xpidl.exe (or just xpidl on other systems) is in the default executable path, and also add a variable called GECKO_SDK, that points to your SDK build:
export GECKO_SDK=/path/to/your/sdk
Our build system should pick it up from there. To make it work in Komodo in Unix-based systems, we add the command to the .bash_login file in the home directory, and we modify the commands to this:
bash -c ". ~/.bash_login; make"
An example project with XPCOM components is included in the XPCOM section. There is also a mention about building C++ XPCOM, which is something much more complicated.
Signing extensions
In order to provide additional security for your users, you can choose to add a signature to your extension. The signature verifies that you are the author of this extension, and it can only be done if you have a valid certificate provided by a trusted Certificate Authority.
The only noticeable difference for the user is that the XPI installation dialog will say that the extension was created by you, making the dialog a little easier to trust. It's not common to sign extensions because most users will trust the official add-ons site (AMO) rather than rely on extension signatures. On the other hand, it is standard practice for big companies to sign their extensions.
You'll need to download some libraries in order to be able to sign your extension. Follow the instructions, and add something like the following to your Makefile:
# The directory where the signature sources are located.
signature_dir := signature

# The signing key /certificate file.
signature_extra_files := $(build_dir)/META-INF/manifest.mf \
                         $(build_dir)/META-INF/zigbert.sf
# The signing key /certificate file.
signature_rsa_file = $(build_dir)/META-INF/zigbert.rsa# The signing key /certificate file.
signature_files := $(signature_extra_files) \
                   $(signature_rsa_file)

$(signature_files): $(build_dir) $(xpi_built)
  @signtool -d $(signature_dir) -k $(cert_name) \
  -p $(cert_password) $(build_dir)
Keep in mind that your password should not be in your Makefiles, and you must be very careful with the certificate information. Ideally this should be handled by a single person, and only done near the end of the release process. You should also have a different make command, such as make signed in order to distinguish the signed and unsigned development builds.
Firefox profile management
It is good development practice to keep your test environment separate from everything else. You don't want unstable extensions to break your everyday Firefox profile, risking data loss. It's much better to have a different "version" of Firefox for testing. This is what Firefox profiles are for.
You can learn about setting up multiple Firefox profiles in the Mozilla Support article Managing Profiles. You can have as many profiles as you like. You can also mix them with multiple Firefox installations. For instance, you may want to test your extension in Firefox 3.5 and Firefox 3.6, or test it in a localized version of Firefox. You can install as many Firefox versions as you want, and mix profiles and versions.
On Windows and Linux it's easy to create shortcuts for every profile you create, using the commands described at http://kb.mozillazine.org/Command_line_arguments .
For Mac OS X developers, there is also a way to set up "shortcuts". You can do this by opening the Automator application, choosing Run Shell Script and then entering the profile-loading script in the textbox:
/Applications/Firefox.app/Contents/MacOS/firefox-bin -no-remote -p MyProfile > /dev/null &
You can change "/dev/null" to a file location, in case you want to see dump output from Firefox, or other extensions. The last & prevents Automator from waiting for your Firefox session to finish. Save this as an Application, not a Workflow. And you probably want to have these on your Desktop or Dock, for easy access.
There are also some configuration changes you should make in your testing profiles, so that you get detailed error information in case something fails. The Firefox Error Console (Tools > Error Console) normally displays JavaScript errors that occur on web pages, but with some tweaking you can get error information from your extension. Read this piece on Development preferences.
Developer extensions
There's a wide variety of Firefox extensions that aid web development and add-on development. A good place to look for them is the Mozilla Add-ons site, and there's also a good development extension list here. You should also take some time to play around with the Web Developer tools that are included in Firefox. Some of them can be very useful for add-on development and overlap with the add-ons listed. In this section we'll cover a few that we have found to be very useful.
DOM Inspector
The DOM Inspector used to be part of Firefox as an installer option, but since Firefox 3 it has been separated as another add-on you can add and remove. It's a very useful inspection tool that lets you look into the DOM of HTML and XUL documents, as well as applied CSS rules and associated JavaScript objects. Introduction to DOM Inspector is a good guide on how to get started using it.
The DOM inspector is particularly useful in finding out how to overlay a window, and how to replace default CSS style rules. You can see the names of the files involved, which gives you a good starting point when looking into the Mozilla source. You can even change styles, attributes and execute Javascript code in it, although that's not completely reliable.
JavaScript Debugger
The name says it all. The Venkman JavaScript Debugger is a great way to trace execution of your JavaScript code.
To debug extension and browser code, right-click on the Loaded Scripts panel and uncheck Exclude Browser Files. The list of loaded scripts will grow long to include all of the scripts in Firefox. Having our file naming conventions prove very useful in this case. You can set breakpoints, step in and out of methods, and even get profiling information from Javascript execution. You can inspect variables, keep track of watch expressions, and evaluate arbitrary JS at any point in execution.
This extension has seen little maintenance in quite some time, so it is very buggy. It is specially unreliable when debugging code in Javascript XPCOM and XBL files. Nevertheless, it is a valuable tool when trying to figure out why a certain function is misbehaving.
Tamper Data
Tamper Data intercepts HTTP requests and their responses. It allows you to cancel them and even replace payload data before it is sent. There are several similar extensions, such as Live HTTP Headers, but Tamper Data is the one that we use the most. We'll cover more on HTTP debugging later on.
Firebug
The Firebug extension includes pretty much all tools mentioned so far, but it's mostly focused on web development. The Chromebug extension helps in making Firebug more useful for extension development, but it may still not be powerful enough to replace all of the previously mentioned add-ons.
On the other hand, Firebug has a very friendly, integrated user interface, and sees much more development that its counterparts. It's definitely worth a try.
Leak Monitor
Memory leaks have always been a big criticism drawn against Firefox. Mozilla has proven with time that they take memory usage seriously, improving performance on several critical areas and removing all kinds of memory leaks.
However, extensions are also capable of causing memory leaks. If you want your extension to be included in the Mozilla Add-ons site, you better not have any memory leaks. Using XPCOM in JavaScript has some guidelines you should follow to avoid them. One of the most common errors developers make is to register a JS event listener or observer, and never removing it. The simple practice of always including removal code for everything you add makes a big difference.
To make sure your extension doesn't leak, you should use the Leak Monitor extension when testing it. Always test opening and closing windows. Leaks usually surface when doing this.
Exercise
- Set up a new Firefox profile for XUL School. Make sure you can open and close your XUL School Firefox without having to close the instance of Firefox you use to browse normally. Make any modifications you want to the XUL School project, run make install and restart Firefox to see the extension work with your changes.
- Install DOM Inspector. Use it to locate the menu you created. Hint: You can search for an element by id. Inspect the CSS rules Firefox applies to it by default. Look at the final, computed style for the menu items. Browse around the rest of the Firefox DOM, and try to figure out what the nodes correspond to in the Firefox UI.
- Install the Firebug extension. Open the Firebug window and go to an AJAX-heavy page such as Gmail or Facebook. Open and enable the Net tab. Try to identify what is going on with some of the requests being sent.
Now that you know how to quickly monitor your project and test changes, we'll learn how to add new UI elements to Firefox, through overlays and new windows.
This tutorial was kindly donated to Mozilla by Appcoast.