
Introduction
DHTML Accessibility is a new technology which enables developers to construct accessible controls within (X)HTML pages. Developers have been doing this for some time, but the resulting controls were never as accessible as similar controls in desktop applications. Assistive technologies could only see the generic HTML markup used to build the control; they had no way of knowing that a particular collection of div and span elements should be treated as a single cohesive control (such as a tab bar or a treeview).
By implementing DHTML Accessibility techniques, web developers can declare that generic HTML elements are really acting as specific GUI controls (such as a treeitem within a treeview). Firefox 1.5 is the first browser to support DHTML Accessibility; it maps the declarations within the HTML page to the underlying accessibility architecture so that assistive technologies can "read" a web page and know how to present these complex controls to the end user.
This has all been well-documented for some time. However, it is less well-known that the same DHTML Accessibility techniques can be applied to XUL, Mozilla's XML markup language for building user interfaces. (The Firefox interface itself is built in XUL, as well as the graphical interface presented by Firefox extensions.)
XUL itself has a much richer set of built-in controls than HTML. There is generally no need to build your own XUL tab bar or treeview. Firefox ships with a tabbox element and a tree element, and these elements are fully accessible out-of-the-box. However, if you are building custom controls in XUL, you may need to use DHTML Accessibility techniques to ensure that your custom controls are equally accessible.
A Super-Simple Spreadsheet
To build our XUL spreadsheet, we'll use three built-in XUL controls:
- A single
gridelement to contain the other elements and position them in rows and columns. descriptionelements for each row and column header.labelelements for each cell in the spreadsheet.
The XUL markup is straightforward. We define the grid, then define the headers for each row (numbered 1 through 7), then define the column header and cells for each column. The label for each header and cell is defined in the value attribute. The flex attributes are simply for layout.
Note: the row and column headers are denoted by description elements, and individual cells are denoted by label elements. This is not an accessibility requirement; as we'll see in the next section, the actual XUL elements are irrelevant because we will define the role of each element in a separate attribute.
<code>
<grid class="spreadsheet" id="accjaxspreadsheet" flex="1">
  <rows flex="1"></rows>
  <columns flex="1">
    <column>
      <description value="Entry #"/>
      <description value="1"/>
      <description value="2"/>
      <description value="3"/>
      <description value="4"/>
      <description value="5"/>
      <description value="6"/>
      <description value="7"/>
    </column>
    <column flex="1">
      <description value="Date"/>
      <label value="03/14/05" flex="1"/>
      <label value="03/15/05" flex="1"/>
      <label value="03/15/05" flex="1"/>
      <label value="03/16/05" flex="1"/>
      <label value="03/16/05" flex="1"/>
      <label value="03/16/05" flex="1"/>
      <label value="03/16/05" flex="1"/>
    </column>
    <column flex="1">
      <description value="Expense"/>
      <label value="Conference Fee" flex="1"/>
      <label value="lodging" flex="1"/>
      <label value="dinner" flex="1"/>
      <label value="lodging" flex="1"/>
      <label value="breakfast" flex="1"/>
      <label value="lunch" flex="1"/>
      <label value="dinner" flex="1"/>
    </column>
<-- several columns omitted for brevity -->
  </columns>
</grid>
</code>
Now we can use CSS to add some minimal styling to make it actually look like a spreadsheet.
<code>
@namespace url("http://www.mozilla.org/keymaster/gatekeeper/there.is.only.xul");

grid.spreadsheet {
  border: thin solid;
}

grid.spreadsheet label {
  border-bottom: 1px solid black;
  border-left: 1px solid black;
  margin: 0;
  padding: 3px;
}

grid.spreadsheet description {
  color: black;
  background-color: white;
  margin: 0px;
  padding: 2px;
  border-left: thin solid;
  border-bottom: thin solid;
  font-family: monospace;
  font-size: 12pt;
  text-align: center;
  font-weight: bold;
}
</code>
You can see the results by installing stage-1.xpi, restarting Firefox, and selecting AccJax from the Tools menu. The final product looks like this:
|
|
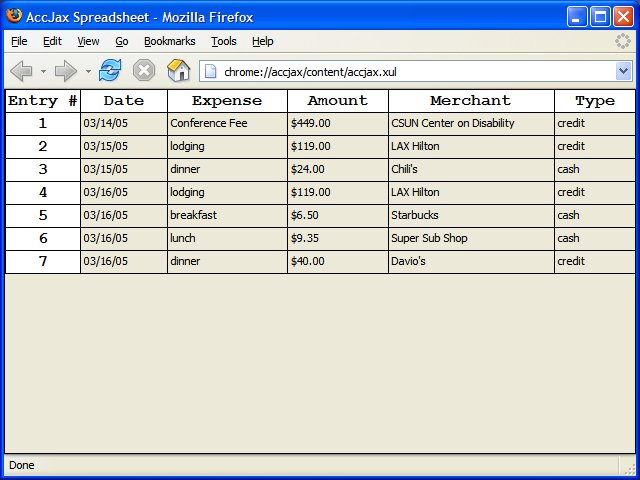
Although this has the visual layout of a spreadsheet, assistive technologies will only see it as a collection of individual, unrelated text labels. If we inspect this with the MSAA Inspect32 tool, we see that each cell is exposed as role="text".
|
|
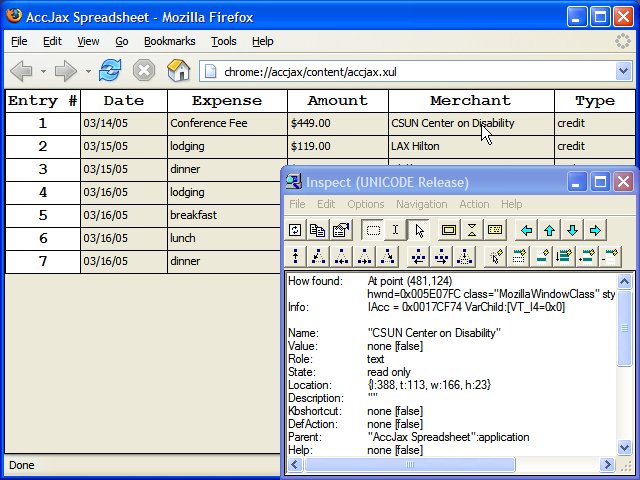
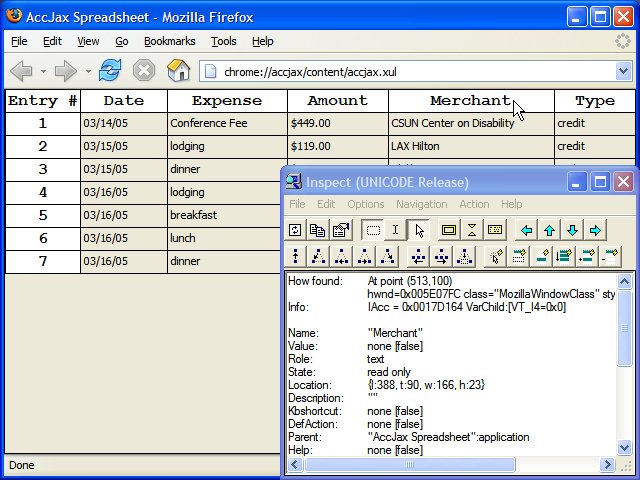
Assistive technologies also have no idea that our row headers and column headers are really headers. Again, they are exposed as role="text".
|
|
So, before we do anything else, we need to tell assistive technologies that all of these unrelated elements are actually related. This is where DHTML Accessibility comes in.
Further reading
- grid element reference
- description element reference
- label element reference
- grid tutorial
- label tutorial
Adding Roles With DHTML Accessibility
Using the new DHTML Accessibility techniques in Firefox 1.5, we can declare the role of each element in our spreadsheet.
- The
gridelement is really a spreadsheet. - Each
labelelement is really a cell within the spreadsheet. - Each
descriptionelement is really a row or column header within the spreadsheet.
You can find a list of all the supported roles in Firefox 1.5 on mozilla.org.
Role declarations are a little confusing at first glance, but they all follow the same pattern. The role attribute itself is in the XHTML 2 namespace. We will need to declare the namespace (xmlns:x2="http://www.w3.org/TR/xhtml2") so we can add an xhtml2:role attribute to each XUL element.
The role attribute value is also in a namespace. We will need to declare this namespace as well (xmlns:wairole="http://www.w3.org/2005/01/wai-rdf/GUIRoleTaxonomy#"), and then use this namespace prefix (wairole:) as part of the role attribute value. This will become clearer with some concrete examples:
- The
gridelement is the container for the entire control; it gets a role of "wairole:spreadsheet". - Some of the
descriptionelements are row headers, and others are column headers. They each get the appropriate role, "wairole:rowheader" or "wairole:columnheader". - Each
labelelement is an individual cell and needs a role of "wairole:gridcell".
This means we actually need to declare two namespaces, the XHTML 2 namespace and the wairole namespace. We can declare both of them at the top of our .xul file and then reuse them as often as we need.
<code>
<window
    id="accjax"
    title="AccJax Spreadsheet"
    xmlns="http://www.mozilla.org/keymaster/gatekeeper/there.is.only.xul"
    xmlns:x2="http://www.w3.org/TR/xhtml2"
    xmlns:wairole="http://www.w3.org/2005/01/wai-rdf/GUIRoleTaxonomy#"
    >
</code>
Once the namespaces are in place, we define the roles for each component of our spreadsheet.
<code>
<grid x2:role="wairole:spreadsheet" class="spreadsheet" id="accjaxspreadsheet" flex="1">
  <rows flex="1"></rows>
  <columns flex="1">
    <column>
      <description x2:role="wairole:rowheader" value="Entry #"/>
      <description x2:role="wairole:rowheader" value="1"/>
      <description x2:role="wairole:rowheader" value="2"/>
      <description x2:role="wairole:rowheader" value="3"/>
      <description x2:role="wairole:rowheader" value="4"/>
      <description x2:role="wairole:rowheader" value="5"/>
      <description x2:role="wairole:rowheader" value="6"/>
      <description x2:role="wairole:rowheader" value="7"/>
    </column>
    <column flex="1">
      <description x2:role="wairole:columnheader" value="Date"/>
      <label x2:role="wairole:gridcell" value="03/14/05" flex="1"/>
      <label x2:role="wairole:gridcell" value="03/15/05" flex="1"/>
      <label x2:role="wairole:gridcell" value="03/15/05" flex="1"/>
      <label x2:role="wairole:gridcell" value="03/16/05" flex="1"/>
      <label x2:role="wairole:gridcell" value="03/16/05" flex="1"/>
      <label x2:role="wairole:gridcell" value="03/16/05" flex="1"/>
      <label x2:role="wairole:gridcell" value="03/16/05" flex="1"/>
    </column>
    <column flex="1">
      <description x2:role="wairole:columnheader" value="Expense"/>
      <label x2:role="wairole:gridcell" value="Conference Fee" flex="1"/>
      <label x2:role="wairole:gridcell" value="lodging" flex="1"/>
      <label x2:role="wairole:gridcell" value="dinner" flex="1"/>
      <label x2:role="wairole:gridcell" value="lodging" flex="1"/>
      <label x2:role="wairole:gridcell" value="breakfast" flex="1"/>
      <label x2:role="wairole:gridcell" value="lunch" flex="1"/>
      <label x2:role="wairole:gridcell" value="dinner" flex="1"/>
    </column>
<-- several columns omitted for brevity -->
  </columns>
</grid>
</code>
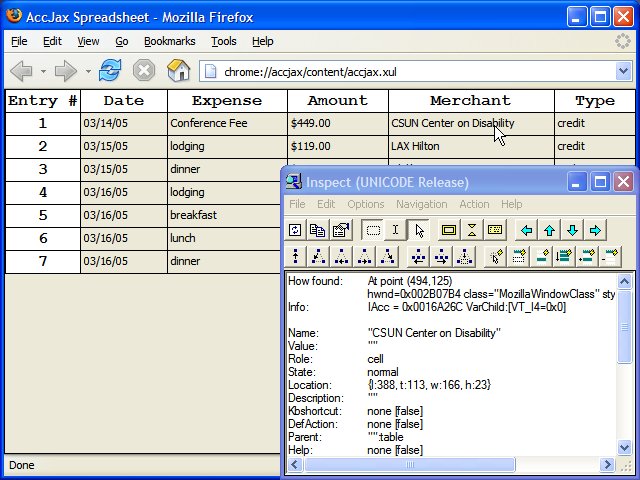
The resulting spreadsheet looks exactly the same visually, but the difference to an assistive technology is enormous. Each label, which was previously exposed as a text label, is now exposed as a cell.
|
|
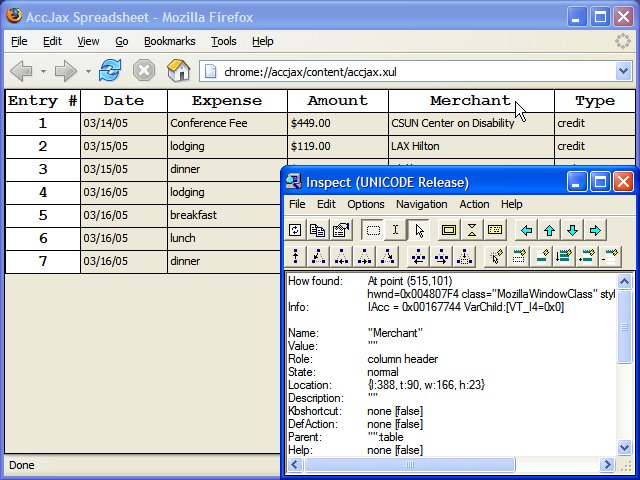
Each column header, previously exposed as a text label, is now exposed to assistive technologies as an actual column header.
<caption>Column headers are exposed as column headers</caption>|
|
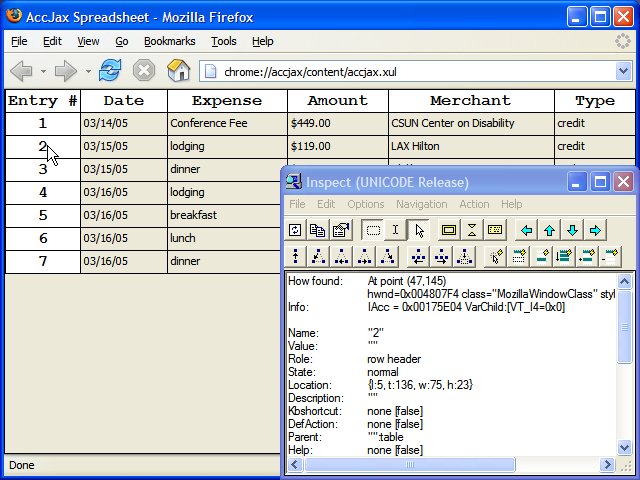
Row headers are also exposed properly.
<caption>Row headers are exposed as row headers</caption>|
|
That's it! Well, not quite. We still have no way to focus individual cells, nor do we have a way to navigate the spreadsheet with the keyboard. But that's it as far as DHTML Accessibility goes. All you need to do is declare two namespaces and assign the appropriate role attributes, and Firefox handles exposing the elements properly to the underlying assistive technology.
Further reading
Focus Issues
The next step on the road to an accessible spreadsheet is the focus problem.
In HTML documents, you can make any element focusable with the tabindex attribute. In XUL, there is no tabindex attribute; to make a XUL element focusable, you need to use a Mozilla-specific CSS property, -moz-user-focus: normal.
<code>
grid.spreadsheet {
  border: thin solid;
  -moz-user-focus: normal;
}
</code>
In HTML documents, Firefox draws a focus rectangle around the currently focused element. In XUL, we will need to handle this ourselves, again with CSS rules. You might initially think of using the CSS border property, but that will add width and height to the focused cell. A better approach is to use the CSS outline property, which does maintains the element's dimensions. (Technically, it draws the border inside the element instead of outside.)
<code>
grid.spreadsheet description:focus,
grid.spreadsheet label:focus {
  outline: 1px dotted black;
  outline-offset: -2px;
}
</code>
However, neither of those are our biggest problem. We want this collection of XUL elements to act like a single control, a spreadsheet. We want to be able to TAB to the spreadsheet, then TAB off of it, without cycling through every single cell inside the spreadsheet. (In the next section we'll add support for the arrow keys to move between cells.) That means that we don't want to make every label and description element focusable.
After much experimentation, I found the solution for this. We need to set the containing grid to be focusable, which will put the spreadsheet itself in the tab order. The individual cells, row headers, and column headers are not in the tab order, but we can still set focus to them programmatically using JavaScript whenever the user clicks a specific cell. But since the individual cells are not in the tab order, clicking on a spreadsheet cell and tabbing off will move to the spreadsheet's next sibling control, which is what we want. The only remaining issue is that when the spreadsheet regains focus (by pressing SHIFT-TAB, or cycling all the way around the tab order and coming back into the spreadsheet), we need to programmatically reset the focus to the previously focused cell. This is handled in the spreadsheet_focus function, which is registered as a handler for the focus event.
<code>
var gFocusCell = null;

function install_handlers() {
    var spreadsheet = window.document.getElementById('accjaxspreadsheet');
    spreadsheet.addEventListener('focus', spreadsheet_focus, true);
    spreadsheet.addEventListener('click', spreadsheet_click, true);
}

function spreadsheet_focus(e) {
    if (e.target.tagName == 'grid') {
        if (!gFocusCell) {
            gFocusCell = e.target.getElementsByTagName('label')[0];
        }
        gFocusCell.focus();
    } else {
        gFocusCell = e.target;
    }
}

function spreadsheet_click(e) {
    e.target.focus();
}
</code>
Finally, we'll add two lines to our .xul file to link in the JavaScript file (accjax.js) and call the install_handlers function when the spreadsheet is loaded.
<code>
<window
    id="accjax"
    title="AccJax Spreadsheet"
    xmlns="http://www.mozilla.org/keymaster/gatekeeper/there.is.only.xul"
    xmlns:x2="http://www.w3.org/TR/xhtml2"
    xmlns:wairole="http://www.w3.org/2005/01/wai-rdf/GUIRoleTaxonomy#"
    xmlns:waistate="http://www.w3.org/2005/01/wai-rdf/GUIStateTaxonomy#"
    onload="install_handlers()"
    >

<script src="accjax.js"/>
</code>
By adding this JavaScript code and these CSS rules, we can
- Tab to the spreadsheet
- See which cell, row header, or column header has focus
- Click on other cells or headers to change focus within the spreadsheet
- Tab off the spreadsheet by pressing
TABonce - Tab back to the spreadsheet and automatically set focus to the previously focused cell or header
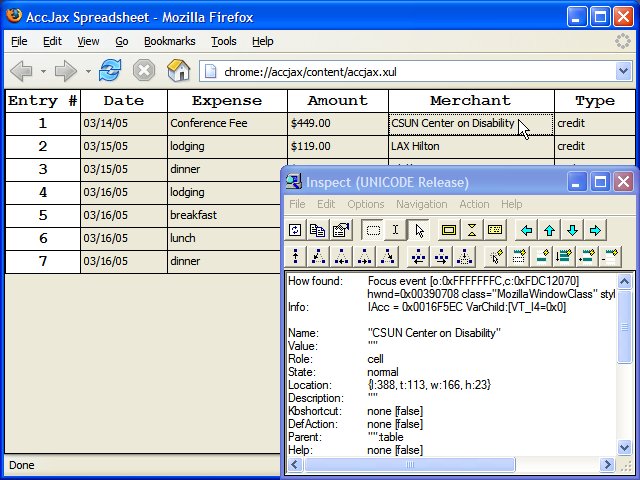
Inspect32 confirms that all of this really works; it's not just visual smoke and mirrors. When you click a spreadsheet cell, assistive technologies track the focus change and know which cell has received focus.
<caption>Cells really get focus</caption>|
|
Clicking a row or column headers also changes the focus properly.
<caption>Cells really get focus</caption>|
|

Further reading
- Key-navigable custom DHTML widgets on
mozilla.org
Adding Keyboard Navigation
True accessibility requires complete keyboard navigability. We've already added the spreadsheet itself to the tab order, but that was only the first half. The second half is navigating between the cells and headers within the spreadsheet.
As I mentioned in the previous section, we don't want to make every cell and header focusable. Other compound controls such as lists and treeviews support two-phased keyboard navigation. You can press TAB to get onto the control itself, then you can press the arrow keys to move around within the control. We want to do the same thing with our spreadsheet control.
Events in XUL are similar to events in HTML documents. You can register event handlers on specific XUL elements, and when an event occurs, it bubbles down the element hierarchy and back up. You can capture events on the way down or on the way up, and registered event handlers get an event object which has all the properties you would expect for that event.
To make a long story short, this means that we can register a single event handler on the spreadsheet itself (technically, the grid element), then check <var>e.target.tagName</var> to see which element actually received the event. There is no need to register event handlers on every single cell within the spreadsheet.
There is one small implementation issue, which stems from the way elements are laid out within the grid element. If you want to navigate up one row, it is relatively easy to find the right cell; it's the previous sibling of the currently focused cell. Similarly, navigating down one row simply requires finding the next sibling of the currently focused cell. But navigating left and right is more difficult, since the cells are laid out in columns. We need to find the Nth child of the previous column. (We could have laid out the grid by rows instead of columns, but that just shifts the complexity to a different navigation command.)
Here is the keyboard navigation code:
<code>
const KEY_UP = 38;
const KEY_DOWN = 40;
const KEY_LEFT = 37;
const KEY_RIGHT = 39;

function cell_keypress(e) {
    var current = e.target;
    switch (e.keyCode) {
    case KEY_UP:
        spreadsheet_up(current);
        break;
    case KEY_DOWN:
        spreadsheet_down(current);
        break;
    case KEY_LEFT:
        spreadsheet_left(current);
        break;
    case KEY_RIGHT:
        spreadsheet_right(current);
        break;
    }
}

function spreadsheet_up(current) {
    var next = find_cell_up(current);
    if (next) {
        next.focus();
    }
}

function spreadsheet_down(current) {
    var next = find_cell_down(current);
    if (next) {
        next.focus();
    }
}

function spreadsheet_left(current) {
    var next = find_cell_left(current);
    if (next) {
        next.focus();
    }
}

function spreadsheet_right(current) {
    var next = find_cell_right(current);
    if (next) {
        next.focus();
    }
}

function get_index_within_parent(current) {
    var arSiblings = current.parentNode.childNodes;
    for (var i = 0; i < arSiblings.length; i++) {
        if (arSiblings[i] == current) { return i; }
    }
    return -1;
}

function find_cell_up(current) {
    var row = get_index_within_parent(current);
    var arSiblings = current.parentNode.childNodes;
    return row == 0 ? null : arSiblings[row - 1];
}

function find_cell_down(current) {
    var row = get_index_within_parent(current);
    var arSiblings = current.parentNode.childNodes;
    return row == arSiblings.length - 1 ? null : arSiblings[row + 1];
}

function find_cell_left(current) {
    var row = get_index_within_parent(current);
    var column = get_index_within_parent(current.parentNode);
    var columns = current.parentNode.parentNode.childNodes;
    return column = 0 ? null : columns[column - 1].childNodes[row];
}

function find_cell_right(current) {
    var row = get_index_within_parent(current);
    var column = get_index_within_parent(current.parentNode);
    var columns = current.parentNode.parentNode.childNodes;
    return column == columns.length - 1 ? null : columns[column + 1].childNodes[row];
}
</code>
Finally, we need to register the spreadsheet_keypress event handler.
<code>
function install_handlers() {
    var spreadsheet = window.document.getElementById('accjaxspreadsheet');
    spreadsheet.addEventListener('keypress', spreadsheet_keypress, true);
    spreadsheet.addEventListener('focus', spreadsheet_focus, true);
    spreadsheet.addEventListener('click', spreadsheet_click, true);
}
</code>
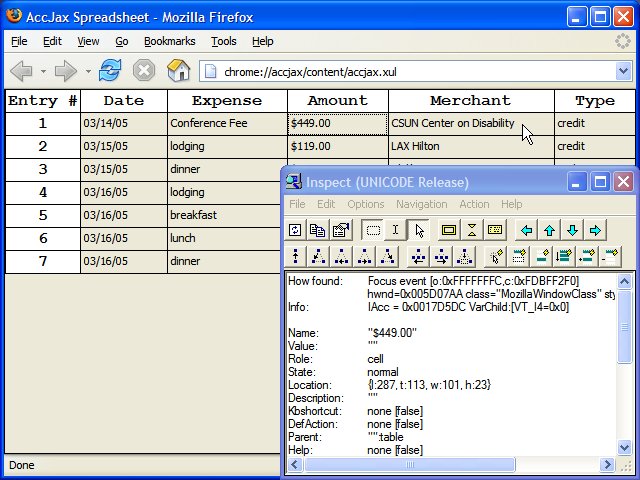
With this new event handler and associated helper functions, we can navigate between cells and headers using the arrow keys. Inspect32 confirms that assistive technologies track the focus as we navigate within the spreadsheet.
<caption>Focus is tracked properly during keyboard navigation</caption>|
|
Further reading
Adding Editing Capabilities
We now have a fully accessible XUL spreadsheet, correctly focusable, correctly keyboard-navigable, and correctly exposed to assistive technologies. We could stop now, but we won't. What good is a spreadsheet if you can't edit it?
We need to define a specific action that will trigger editing the currently focused cell. To maintain compatibility with the accessible HTML spreadsheet demo, I chose the ENTER key to trigger editing mode.
When the user presses ENTER, we replace the currently focused XUL label element with a XUL textbox element, copy the initial value over to the textbox element, and call its focus and select methods to set focus to the textbox and select the entire value.
We register two event handlers on the textbox: onkeypress and onblur. If the user presses ENTER while editing the cell, we "accept" the value by recreating the original label and copying the new value back. If the user presses ESC, we "cancel" the edit by simply recreating the original label and restoring its previous value. Finally, if the user hits TAB while editing, we treat this as acceptance and recreate the label with the new value, then let Firefox manage changing focus to the spreadsheet's next sibling. (We don't need any special code to track the focus change; we just need an onblur handler to accept the edited value before the focus changes.)
First, the code to trigger edit mode:
<code>
const KEY_UP = 38;
const KEY_DOWN = 40;
const KEY_LEFT = 37;
const KEY_RIGHT = 39;
const KEY_ENTER = 13;
const KEY_ESCAPE = 27;

function cell_keypress(e) {
    var current = e.target;
    switch (e.keyCode) {
    case KEY_ENTER:
    if (current.tagName == 'label') {
            start_edit(current);
    }
        break;
    case KEY_UP:
        spreadsheet_up(current);
        break;
    case KEY_DOWN:
        spreadsheet_down(current);
        break;
    case KEY_LEFT:
        spreadsheet_left(current);
        break;
    case KEY_RIGHT:
        spreadsheet_right(current);
        break;
    }
}
</code>
Second, the code to handle replacing the label with a textbox (to start editing) and the textbox with a label (to finish editing). Note that when we recreate the label element after editing, we need to explicitly restore the role attribute of the label, so that assistive technologies will continue to treat it as a cell within the spreadsheet.
<code>
const XUL_NS = "http://www.mozilla.org/keymaster/gatekeeper/there.is.only.xul";
const X2_NS ="http://www.w3.org/TR/xhtml2"

function start_edit(label) {
    var value = label.value;
    setTimeout(function(){
	var textbox = document.createElementNS(XUL_NS, "textbox");
	label.parentNode.replaceChild(textbox, label);
	textbox.value = value;
	textbox.origValue = value;
	textbox.flex = 1;
	textbox.focus();
	textbox.select();
	textbox.addEventListener("blur", editable_cell_blur, true);
	textbox.addEventListener("keypress", editable_cell_keypress, true);
    }, 0);
}

function done_edit(textbox, keepValue) {
    var value = textbox.value;
    var label = document.createElementNS(XUL_NS, "label");
    label.setAttributeNS(X2_NS, "role", "wairole:gridcell");
    textbox.parentNode.replaceChild(label, textbox);
    if (keepValue) {
	label.value = value;
    } else {
	label.value = textbox.origValue;
    }
    label.flex = 1;
    label.addEventListener("keypress", cell_keypress, true);
    return label;
}

function editable_cell_blur(e) {
    var textbox = e.target;
    setTimeout(function() {
	done_edit(textbox, true);
    }, 0);
}

function editable_cell_keypress(e) {
    var textbox = e.target;
    switch (e.keyCode) {
    case KEY_ENTER:
	setTimeout(function() {
	    var label = done_edit(textbox, true);
	    label.focus();
	}, 0);
	break;
    case KEY_ESCAPE:
	setTimeout(function() {
	    var label = done_edit(textbox, false);
	    label.focus();
	}, 0);
	break;
    }
}
</code>
With this new code, we can now navigate to a specific cell within the spreadsheet and press ENTER to edit the value. The start_edit function replaces the label with a textbox, which allows the user to change the cell value.
|
|
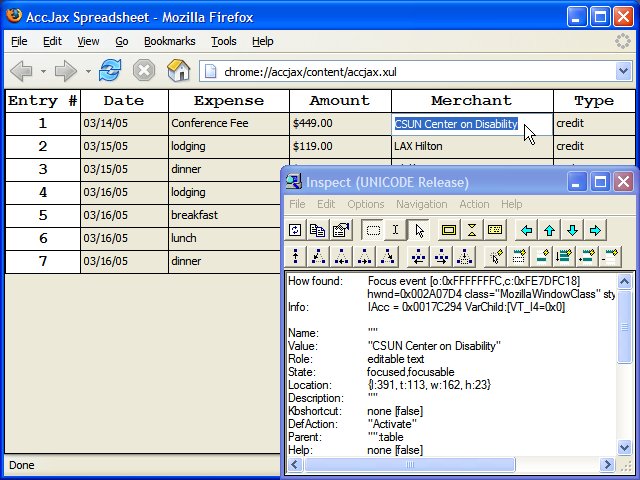
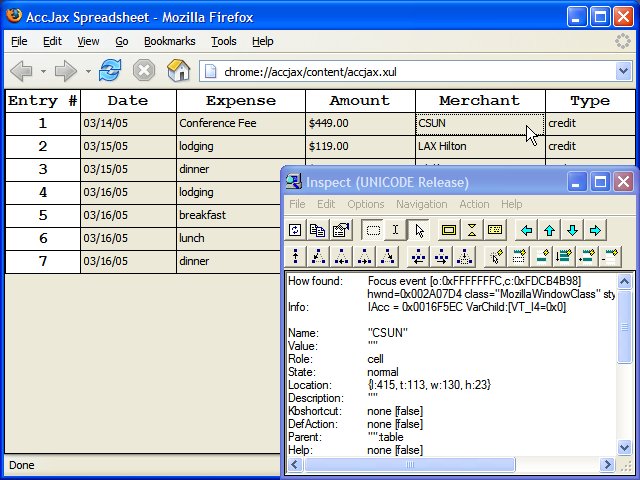
Once we're satisfied with our changes, we can press ENTER again to accept the value. The done_edit function recreates the original label element and sets the new value. Note that the role is once again "cell", since we explicitly set it when we recreated the label element.
|
|
Further reading
- Accessible HTML spreadsheet demo on
mozilla.org
Future Enhancements
Now that we know how to create an accessible spreadsheet, it should be possible to use XBL to create a reusable component that encapsulates the accessibility implementation. All of the DHTML Accessibility roles, the keyboard navigation, and the focus tracking could be defined within the XBL file. This would allow XUL developers to add a single spreadsheet element to their XUL applications (for example), with rowheader, columnheader, and cell elements as children, without requiring them to manage the accessibility support for each spreadsheet control.