
This page tells you step-by-step how to make a custom toolbar button in Firefox, SeaMonkey 2.0, Thunderbird or Sunbird. (For SeaMonkey 1.x, see the page Custom Toolbar Button:SeaMonkey.)
You do not need any special technical skills or tools, and almost all the information you need is on this page.
Introduction
The technique described here does not involve any hacking. Instead, you make your custom button as a self-contained extension in your profile.
You can use the sample code provided here to make buttons that do various useful things. If you know how to program in JavaScript, then you can write your own code that does other things.
You can use this page if all you really want is a button for some special purpose.
You can also use this page to learn about extensions, and as a starting point if you plan to write a more complex extension. Note that this extension is very simplified. Use other tutorials and articles to find out more—the main Extensions page here is a good starting point. In particular, the articles Creating toolbar buttons and Building an Extension explain the process in more detail.
Supported applications
You can use the steps on this page with any or all of these Mozilla applications:
- Firefox 1.5 or a later version
- SeaMonkey 2.0 or a later version
- Thunderbird 1.5 or a later version
- Sunbird 0.3 or a later version
Pre-release versions of these (alphas, betas and release candidates) are also OK.
In the rest of this page, the term application means the Mozilla application where you want to add the button.
Note: There is a similar tutorial for SeaMonkey 1.x on the page: Custom Toolbar Button:SeaMonkey
Earlier versions and other Mozilla applications also support extensions, but some parts of this tutorial are not appropriate for them.
Required tools
You will need two tools. Your operating system normally provides them:
- A way to create and work with files and directories
- A text editor for plain text files
Character encoding
Some text editors have a setting for character encoding.
If your language uses only plain Latin (ASCII) characters, set your text editor to use any encoding except Unicode.
If your language uses accents or other non-Latin characters, set your text editor to save files using the UTF-8 encoding.
To check your text editor, create a plain text file named test.txt. In the file, type some of the special characters that your language uses. Save the file.
Open the file in Firefox (for example, by dragging it and dropping it in Firefox, or by choosing File – Open File... from Firefox's menu bar).
From Firefox's menu bar, choose View – Character Encoding – Unicode (UTF-8). Check that the text you typed looks OK with this setting.
If your text editor does not support UTF-8, search the Internet for a better one that you can download.
Optional tools
You can optionally use any image editor to customize the images.
You can optionally use a jar tool or zip tool to package your button as a cross-platform installable (XPI) for other people to install and use.
Making a button
There are ten easy steps.
When you have completed all the steps, you will have a structure like this in your profile directory:
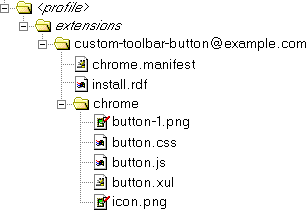
The profile directory and the extensions directory already exist. You will add the other directories and files that are shown in the diagram. (Other directories and files also exist, but the diagram does not show them.)
extensions directory there.
Note: For information about how to find the profile directory, see: Profile folder
Explanation: The profile directory contains information specific to a user, keeping it separate from the application. If the application is reinstalled or upgraded, information in the profile is not affected.
extensions directory, create a new directory with the following name.
Copy the name from here and paste it, to avoid typing errors:
Perform the following steps in this new directory, creating two files and a directory there.
Explanation: The name is a unique identifier for the extension. There is more information about identifiers in a later section of this tutorial.
install.rdf.
Copy the following content, making sure that you scroll to get all of it. Paste it into the new file:
<?xml version="1.0"?>

<RDF xmlns="http://www.w3.org/1999/02/22-rdf-syntax-ns#"
     xmlns:em="http://www.mozilla.org/2004/em-rdf#">

  <Description
    about="urn:mozilla:install-manifest"

    em:name="Custom Button"
    em:description="My custom toolbar button"
    em:creator="My name"

    em:id="custom-toolbar-button@example.com"
    em:version="1.0"
    em:homepageURL="http://developer.mozilla.org/en/docs/Custom_Toolbar_Button"

    em:iconURL="chrome://custombutton/content/icon.png" >

    <em:targetApplication><!-- Firefox -->
      <Description
        em:id="{ec8030f7-c20a-464f-9b0e-13a3a9e97384}"
        em:minVersion="1.4"
        em:maxVersion="*" />
    </em:targetApplication>

    <em:targetApplication><!-- Thunderbird -->
      <Description
        em:id="{3550f703-e582-4d05-9a08-453d09bdfdc6}"
        em:minVersion="1.5"
        em:maxVersion="51.0" />
    </em:targetApplication>

    <em:targetApplication><!-- Sunbird -->
      <Description
        em:id="{718e30fb-e89b-41dd-9da7-e25a45638b28}"
        em:minVersion="0.2.9"
        em:maxVersion="99" />
    </em:targetApplication>

    <em:file>
      <Description
        about="urn:mozilla:extension:custombutton"
        em:package="content/custombutton/" />
    </em:file>

  </Description>

</RDF>
Optionally customize the file by changing the name, description and creator. Change the text between double-quote characters on these three lines.
Optionally remove the sections for target applications that you do not want.
Save the file.
Explanation: This file contains information used by the application's extension manager. Sections for target applications specify the versions where the extension works. The last section in the file specifies that this extension adds content to the application.
chrome.manifest.
Copy the following content, and paste it into the new file:
content custombutton chrome/
style chrome://global/content/customizeToolbar.xul chrome://custombutton/content/button.css

# Firefox
overlay	chrome://browser/content/browser.xul chrome://custombutton/content/button.xul

# Thunderbird mail
overlay	chrome://messenger/content/messenger.xul chrome://custombutton/content/button.xul

# Thunderbird compose
overlay	chrome://messenger/content/messengercompose/messengercompose.xul chrome://custombutton/content/button.xul

# Thunderbird address book
overlay	chrome://messenger/content/addressbook/addressbook.xul chrome://custombutton/content/button.xul

# Sunbird
overlay	chrome://calendar/content/calendar.xul chrome://custombutton/content/button.xul
Optionally remove the sections for toolbars that you do not need.
Save the file.
Explanation: This file defines the extension's content. It adds a stylesheet to the toolbar customization window. Then it specifies an overlay for each toolbar.
chrome.
Perform the following steps in that directory, creating five files there.
Explanation: The chrome directory contains files that specify what the extension does.
button.xul.
Copy the following content, making sure that you scroll to get all of it. Paste it into the new file:
<?xml version="1.0" encoding="UTF-8"?>
<?xml-stylesheet type="text/css"
  href="chrome://custombutton/content/button.css"?>

<!DOCTYPE overlay >
<overlay id="custombutton-overlay"
  xmlns="http://www.mozilla.org/keymaster/gatekeeper/there.is.only.xul">

<script type="application/javascript"
  src="chrome://custombutton/content/button.js"/>

<!-- Firefox -->
<toolbarpalette id="BrowserToolbarPalette">
  <toolbarbutton id="custom-button-1"/>
  </toolbarpalette>

<!-- Thunderbird mail -->
<toolbarpalette id="MailToolbarPalette">
  <toolbarbutton id="custom-button-1"/>
  </toolbarpalette>

<!-- Thunderbird compose -->
<toolbarpalette id="MsgComposeToolbarPalette">
  <toolbarbutton id="custom-button-1"/>
  </toolbarpalette>

<!-- Thunderbird address book -->
<toolbarpalette id="AddressBookToolbarPalette">
  <toolbarbutton id="custom-button-1"/>
  </toolbarpalette>

<!-- Sunbird -->
<toolbarpalette id="calendarToolbarPalette">
  <toolbarbutton id="custom-button-1"/>
  </toolbarpalette>


<!-- button details -->
<toolbarbutton id="custom-button-1"
  label="Custom"
  tooltiptext="My custom toolbar button"
  oncommand="CustomButton[1]()"
  class="toolbarbutton-1 chromeclass-toolbar-additional custombutton"
  />

</overlay>
Optionally customize the file by changing the label and tooltiptext in the last section. Change the text between double-quote characters on these two lines.
Optionally remove the sections for toolbars that you do not need.
Save the file.
Explanation: This XUL file adds the button to the application's toolbar customization palette. It also links to the stylesheet and JavaScript code that the button uses. The last section specifies details of the button.
button.css.
Copy the following content, making sure that you scroll to get all of it. Paste it into the new file:
#custom-button-1,
#wrapper-custom-button-1
  {list-style-image: url("chrome://custombutton/content/button-1.png");}

/* common style for all custom buttons */
.custombutton
  {-moz-image-region: rect( 0px 24px 24px  0px);}

.custombutton:hover
  {-moz-image-region: rect(24px 24px 48px  0px);}

[iconsize="small"] .custombutton
  {-moz-image-region: rect( 0px 40px 16px 24px);}

[iconsize="small"] .custombutton:hover
  {-moz-image-region: rect(24px 40px 40px 24px);}
There is nothing to customize. Save the file.
Explanation: This CSS stylesheet specifies how the button is displayed. It links to the button image, specifying the dimensions of the four parts of the image.
button.js.
Copy the following content, and paste it into the new file:
CustomButton = {

1: function () {
  alert("Just testing")
  },

}
There is nothing to customize for now. Save the file.
The next section in this tutorial contains examples of code that you can use to make your button do something useful.
Explanation: This file specifies what happens when you press the button. It uses the JavaScript programming language, together with features provided by the application.
Get a context menu for the image that you see here (for example, by right-clicking it). Choose Save Image As... from the context menu, and save it in the same chrome directory as the files you have just created. Ensure that the name of the saved file is: button-1.png

Explanation: The image is in four parts. The normal button is at the top left. Underneath it is a darker version, used when the mouse pointer is over the button. The parts on the right are used when you set the toolbar to use small buttons.
Get a context menu for the image that you see here (for example, by right-clicking it). Choose Save Image As... from the context menu, and save it in the same directory as the files you have just created. Ensure that the name of the saved file is: icon.png

Explanation: This image is displayed in the application's Extension Manager window.
Testing your new button
Restart the application.
Either get a context menu for the application's toolbar (for example, by right-clicking it) and choose Customize..., or choose View – Toolbars – Customize... from the application's menu bar.
Drag your new button to where you want it on the toolbar. Press Done to close the toolbar palette window.
Click the button to test it. You should see the pop-up message.
Further development
This section describes how you can develop your button further.
Uninstalling the button
If you ever want to uninstall the button, delete the directory that you created in step 2.
Alternatively, use the application's Extensions window to uninstall the extension in the normal way. The application deletes the directory the next time it starts.
Restart the application.
Troubleshooting
If the button does not appear in the toolbar customization palette, or if you find some other problem, check that you have followed all the steps exactly.
If necessary, uninstall the button and start again, this time without making any changes to the files.
After you get the button working, customize the files carefully.
To see the effect of any change that you make, restart the application.
Advanced troubleshooting
If you have some technical knowledge, then you can use the application's JavaScript console to see error messages. However, you might see messages that are unhelpful or confusing, or that come from other parts of the application.
To open the JavaScript console, choose Tools – Web Developer- Browser Console, and enable JS. Or use short cut "Ctrl + Shift + J"
Messages in the JavaScript console can provide information about JavaScript, XUL or CSS files.
Programming the button
To make your button do something useful, edit the file button.js that you created in step 8.
Remove the line: alert("Just testing") and replace it with JavaScript code that does whatever you want to do.
For a selection of code samples that you can copy and paste, and customize without any knowledge of programming, see this page: Code Samples
Your changes take effect when you restart the application.
Adding more buttons
To add another button, edit button.xul. For each application, duplicate the line that specifies custom-button-1, and change the new line to specify custom-button-2.
Duplicate the last section. In the id and oncommand attributes, change 1 to 2. Change the label and tooltiptext attributes to whatever you want. Do not change the class attribute.
Now edit button.css. Duplicate the first three lines, changing the new lines to specify button-2.
Edit button.js and add JavaScript code for the new button. Be sure to add the extra code before the curly brace on the last line of the file. For example, you could add this code for testing:
2: function () {
  alert("Just testing again")
  },
Create an image for the new button, naming the file button-2.png. The images supplied here are 40 pixels wide and 48 pixels high, with a 256-colour palette and a transparent background, in PNG format. Some other formats will also work.
Here are some more images that you can download and use:


Restart the application and customize the toolbar to find the new button.
You can repeat these steps to add as many buttons as you need.
Distributing your button to other users
If you want to distribute your button or buttons to other users, you must make some changes to avoid conflicts when they install your extension.
Create a new extension ID, in the form:
something@domain-name
It must contain an at-sign (@), making it look something like an e-mail address, but it does not need to be a real e-mail address. Before and after the at-sign, it can only contain the characters A-Z, a-z, 0-9, full stop, hyphen and underscore. If you do not own a domain name, you can make up something else. If you want to make it clear that your made-up name is not a real domain, add .invalid to the end.
Use your new extension ID to rename the directory, and specify the same ID in your install.rdf file.
In your install.rdf file, remove the sections for applications where your button does not work. For example, if your button only works in Thunderbird, remove the sections for Firefox and Sunbird. Do the same in button.xul and chrome.manifest.
Change "custombutton", "custom-button" and "CustomButton" to something else throughout all the files.
Optionally change:
- The button image or images
- The extension icon,
icon.png - The version and home page in your
install.rdffile
Use a jar tool or zip tool to pack the contents of the directory. Name the packed file with the extension .xpi and make it available to other users.
Users can install the XPI file in an application's Extensions window in the normal way.