
Compared to a simple text-editor, Visual Studio gives you some special features when writing XUL:
- IntelliSense / autocompletion for elements and attributes
- Validation
- Syntax coloring (okay, more sophisticated editors like Notepad++ provide this as well)
Before you can use all of this, you have to adjust Visual Studio a little.
1. Setting the correct editor
As XUL files are nothing but XML, you can use the normal XML-editor for writing XUL.
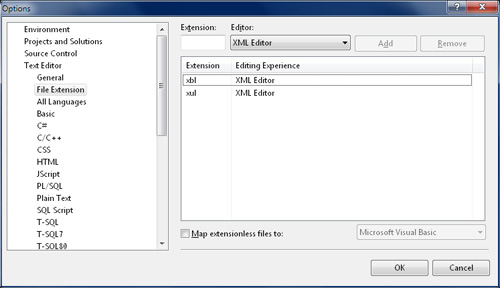
Go to Tools > Options... > Text Editor > File Extension and add the extension "xul" with "XML Editor". As you are already there, you can do the same for "xbl".
2. Using XML schemas
For validation and intellisense Visual Studio needs the XML schema for XUL files. There is a very nice schema created by Mihailo Lalevic. You can download it at xulschema.codeplex.com under the Downloads tab. You should be able to use the schema in other IDE's too.
There is also project that provides XML schema for install manifest files (install.rdf) - installrdfschema.codeplex.com - from the same author as a XUL schema.
The codeplex-page provides some instructions for installing the schema, but there is an easier way. If you already have a XML or XUL file opened, Visual Studio will add the menu item XML to the main menu. Just use XML > Schemas... to add the xul.xsd from the package that you have downloaded.
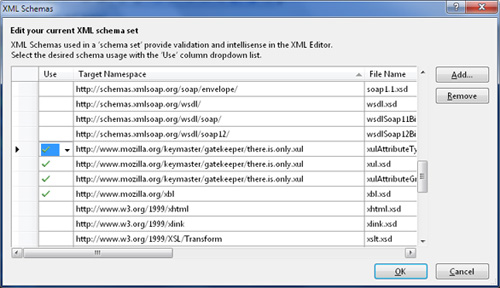
The other xsd files will be added automatically.
Visual Studio will use the schema based on the namespace, so make sure your window element uses the correct XUL namespace http://www.mozilla.org/keymaster/gatekeeper/there.is.only.xul.
3. XBL
If you are writing your own elements in XBL, you can download a XBL schema from mozilla.doslash.org/xblschema. Grab the XSD version and add it in the same way, you added the XUL schema.
To combine both, you can also add your own XBL elements to the XUL schema to get autocompletion-support and validation for those in your XUL files. Mihailo posted some instructions in this Codeplex discussion.
4. Visual Assist and file extensions
Since version 10.5, Visual Assist supports Javascript and XML.
As it does not work out of the box with unknown file extensions (like .xul, .xbl and .jsm), you have to do some registry tricks, so that VA knows how to treat these file types.
All VA options can be found at:
HKEY_CURRENT_USER\Software\Whole Tomato\Visual Assist X\
Find the folder that represents your Visual Studio version ((VANet8, VANet9, etc.) and add your extensions to the corresponding registry entries ExtJS and ExtXml.
Make sure that Visual Studio is not running, when you do this.
5. Problems that need to be solved
There are still some problems for which I did not find a solution yet.
5.1 Localization using DTD
You will get validation errors in Visual Studio, if you are localizing your XUL files. That has to do with the way Mozilla implemented localization:
< !DOCTYPE window SYSTEM "chrome://loomo/locale/main.dtd">
Visual Studio doesn't recognize the chrome URI prefix, what will give you an error at the previous line ("The URI prefix is not recognized"). As VS doesn't know how the chrome protocol works it can't detect where the dtd file is really located and thus will give you errors wherever you use the entities that are declared in this file.
5.2 Text preprocessor
The Mozilla Build System includes a Text preprocessor. As preprocessor directives are not valid XML, Visual Studio will mark them as errors in your XUL files.
5.3 Javascript related
You will get validation errors for Javascript code whenever using the keywords "const" and "let". These keywords are Mozilla-specific at the moment. VS just supports ECMAScript 3rd Edition and thus doesn't know these keywords.