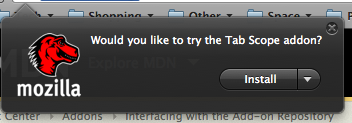
The Add-on Repository JavaScript code module makes it easy for your extension to interface with the AMO repository. You an use the code module to get lists of add-ons and even install new add-ons. This article provides some sample code that queries the recommended add-ons list on AMO and lets the user click a button to install an add-on from the list.
Importing the repository code module
Before you can use the Add-on Repository API, you need to import the code module:
Components.utils.import("resource://gre/modules/AddonRepository.jsm");
Having done this, you can then access the API through the resulting AddonRepository object.
Enabling the recommendation feature
In current builds of Firefox 4, the recommendation API doesn't work because the preference for the URL to query to get recommended add-ons is not included by default; see bug 628785. To make the service work for the time being, you can use code like this when your extension starts up:
var prefsService = Components.classes["@mozilla.org/preferences-service;1"]
                        .getService(Components.interfaces.nsIPrefService);
var prefBranch = prefsService.getBranch("extensions.");

var recUrl = "";

try {
  recUrl = prefBranch.getCharPref("getAddons.recommended.url");
} catch(e) {
  recurl = "";
}

if (recUrl == "") {
  prefBranch.setCharPref("getAddons.recommended.url",
                    "https://services.addons.mozilla.org/%LOCALE%/%APP%/api/%API_VERSION%/list/recommended/all/%MAX_RESULTS%/%OS%/%VERSION%?src=firefox");
  prefsService.savePrefFile(null);
}
This fetches the value of the extensions.getAddons.recommended.url preference, and, if the preference doesn't exist or has no value, sets the value of the preference to the correct one for the AMO site.
Starting a request
To start a search of the repository, you can use either of the following methods:
searchAddons()- Queries the add-on repository for add-ons matching given search criteria.
retrieveRecommendedAddons()- Retrieves a list of recommended add-ons, as determined by the AMO site administrators.
This example will use the latter, in order to randomly select a recommended add-on and offer to install it. However, the code to perform a search term based query would be very similar.
When the user clicks a toolbar button to initiate the query, the following code gets run to start the request:
AddonRepository.retrieveRecommendedAddons(10, this);
This asks the repository to fetch up to 10 add-ons, using the object this as the target for callbacks. The callback object needs to implement the SearchCallback interface, providing the methods that get called when a search either fails or completes successfully.
Handling failed requests
The callback object must have a searchFailed() method; this gets called when a repository search fails to execute. The most common cause of failure (other than the search URL preference being incorrect) is if there is already a pending request, since only one request can be in progress at a time. For example:
searchFailed: function() {
  this.showNotification("I have no recommendations for you right now!",
          "Oh noes!", null);
},
Here, we call a showNotification() method with some parameters that we'll look at shortly when we get to our showNotification() method below. The important thing to note is that this will handle the failure case.
Handling successful requests
The callback object's searchSucceeded() method gets called when a search completes successfully. It receives a list of the matching addons, the number of add-ons returned, and the total number of add-ons that matched the query (in case the returned number is smaller than the requested number, for example).
For example:
searchSucceeded: function(addons, addonCount, totalResults) {
  var num = Math.floor(Math.random() * addonCount);

  this.showNotification("Would you like to try the " + addons[num].name + " addon?",
          "Install", addons[num].install);
},
This routine randomly selects one of the returned add-ons, then calls the previously mentioned showNotification() routine, passing in as parameters a prompt including the name of the returned add-on, a label for the button to show in the notification ("Install"), and the AddonInstall object that can be used with the Add-on Manager API to install the add-on.
Installing the add-on
The showNotification() routine displays a notification box offering to install the recommended add-on, if one was found, or reports an error if the search failed:
showNotification: function(prompt, button, installObj) {
  this.install = installObj;
  var box = PopupNotifications.show(gBrowser.selectedBrowser, "sample-popup",
          prompt,
          null, /* anchor ID */
          {
            label: button,
            accessKey: "I",
            callback: function() {
              if (popupnotifications.install) {
                popupnotifications.install.install();
              } else {
                PopupNotifications.remove(box);
              }
            }
          },
          null  /* secondary action */
          );
}
The code here starts by stashing the passed-in AddonInstall object for later use, then creates and displays the pop-up notification box with the text and button label passed into the method.

The pop-up callback function that gets called when the user clicks the button looks to see if there's a non-null AddonInstall object reference; if it's null, then the pop-up is displaying an error notification, so clicking the button simply dismisses the pop-up. Otherwise, the AddonInstall object's install() method is called to install the add-on.
This doesn't display any UI showing that the install is taking place; however, if you go to the Add-on Manager panel, you'll see the pending install listed among your add-ons.

