
From the Create a New Localization document, an interested localizer can follow a technical step-by-step process that starts the localization process by focusing on how to localize two of the primary types of localization files (DTD and properties) used in the Mozilla source code. With that document, users can see immediately two localized files in their user interface by following closely and carefully the steps to create a language pack or a binary file that is ready for installation. Repeating the process allows a localizer to create a testable package to see his or her work as they progress to a final version.
If you choose to localize Mozilla with nothing more than a text editing application and not a specialized tool, this document (along with Create a New Localization) will enable you to learn just what needs to be done.
Before we start, did you make sure to install Mercurial and confirm that you have set up the proper build environment on your local machine? You cannot begin localizing Mozilla file by file without a specialized tool without going through the Create a New Localization page.
What we will translate
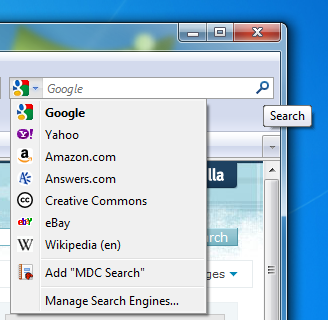
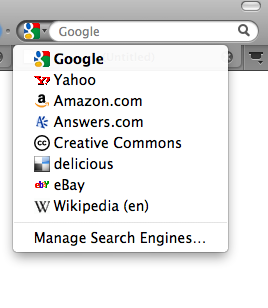
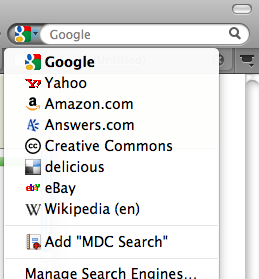
We will translate a small piece of the UI found in the search bar. The search bar is next to the right of the location bar, and by default points to the Google search. If you click on the highlighted arrow pointing down while reading this tutorial on MDC, you will see two string that need to be translated:
- Add "MDC Search"
- Manage Search Engines...
There is also a tooltip that appears when you hover over the magnifying glass icon on the right side of the bar.
Folder structure
Throughout this document, we will be using the following folder structure in all examples:
- your working directory (root)
- mozilla-1.9.2 (en-US source, pulled from http://hg.mozilla.org/releases/mozilla-1.9.2)
- l10n-mozilla-1.9.2 (a directory containing localization directories, one dir per localization; often referred to as "l10n base")
- x-testing (a directory with your localization files)
Please either follow this structure closely or adjust all commands in the documentation as needed by your custom set-up.
Get the source
Change your current directory to your working directory with the following command:
$ cd /path/to/your/working/directory
First, you will need to check out the sources of mozilla-1.9.2 together with the en-US strings. Assuming that you have installed Mercurial, issue the following command:
$ hg clone http://hg.mozilla.org/releases/mozilla-1.9.2
This will pull the Mozilla 1.9.2 sources from the remote repository and create a Mercurial clone in mozilla-1.9.2 inside your working directory.
Next, again in your working dir, create a directory that will serve as localization base:
$ mkdir l10n-mozilla-1.9.2
$ cd l10n-mozilla-1.9.2
Inside this directory you will put all the localization files in a folder named after your locale, e.g. x-testing. Depending on your case, you can do it in one of the following ways:
- If no localization exists yet, create an empty folder and create a Mercurial repository in it:
$ mkdir x-testing
$ cd x-testing
$ hg init
- If there is a BitBucket repository with localization files, you can pull from it. This will automatically create an "x-testing" directory in your current directory (you should be in
l10n-mozilla-1.9.2).
$ hg clone http://bitbucket.org/mozillal10n/x-testing
- If there is an hg.mozilla.org repository with localization files, you can pull from it too:
$ hg clone http://hg.mozilla.org/releases/l10n-mozilla-1.9.2/x-testing
Eventually, you should end up with a folder hierarchy described above in the Folder structure section. You are now ready to start translating!
Getting Started with Compare-Locales
You are going to need to create the structure of your localization, where, one-by-one, each of the files needing localization will be copied. This directory structure needs to mimic the same as the en-US source files concerning localization. You will use a tool called compare-locales to do the comparison between your locale's files and the en-US reference.
First, install compare-locales. You can follow more detailed guidelines on compare-locale's page, but running the following command from the command line should be enough:
$ sudo easy_install -U compare-locales
To start, be sure to open your command line interface and change your directory to where you are keeping your localization files, the en-US sources
$ cd /path/to/your/working/directory
Now, you will need run compare locales. To do this, enter the following commands, keeping sure to change "x-testing" to the actual locale code of your locale.
$ compare-locales mozilla-1.9.2/browser/locales/l10n.ini l10n-mozilla-1.9.2 x-testing
For convenience, try saving the output of this command to a text file on your Desktop so you can review it as you go. Run:
$ compare-locales mozilla-1.9.2/browser/locales/l10n.ini l10n-mozilla-1.9.2 x-testing > ~/Desktop/x-testing.compare
Open the x-testing.compare file that is on your desktop. You should see something like this:
x-testing
  browser
    chrome
      browser
        aboutCertError.dtd
            // add and localize this file
        aboutDialog.dtd
            +aboutLink
            +aboutLink.accesskey
            +aboutVersion
            +closeCmdGNOME.accesskey
            +closeCmdGNOME.label
            +copyright
            +copyright.accesskey
            +copyrightGNOME.accesskey
            +copyrightInfo1
            +copyrightInfo2
            +licenseLink
            +licenseLinkText
        aboutPrivateBrowsing.dtd
            // add and localize this file
        aboutRobots.dtd
            // add and localize this file
        ...
        ...
        ...
x-testing:
unchanged: 2
changed: 3
missingInFiles: 6117
missing: 13
0% of entries changed
The beauty of the compare-locales output is that it tells you all the missing files and which files you need to add and localize. This will be your guide to localize Firefox.
Localizing Step-by-Step
DTD files
In order to provide an example that can be viewed quickly in your UI, we'll start by translating a DTD file named searchbar.dtd that contains the string "Manage Search Engines...". (Strings in the DTD files are called "entities".) "Manage Search Engines..." can easily be found in the Firefox browser UI by clicking on the drop-down arrow in the search box in the upper-right corner of your browser. At the bottom of the list of search engines that appears, you'll see, "Manage Search Engines...".
To start, make sure you are in
/path/to/your/working/directory/l10n-mozilla-1.9.2/x-testing
And then, type the command
mkdir /browser/chrome/browser
Now, step back out to the broader directory that contains both your l10n base (l10n-mozilla-1.9.2) and the en-US source code (mozilla-1.9.2). You can do this by typing:
cd ../../
where each ".." represents the prior sub directory before the main directory where you want to be. You can always check the path by typing
pwd
Once you are in the root working directory with both en-US source and the l10n base, copy the searchbar.dtd file by typing
cp mozilla-1.9.2/browser/locales/chrome/browser/searchbar.dtd l10n-mozilla-1.9.2/x-testing/browser/chrome/browser/
Open the file in your x-testing directory and translate the words inside the quotation marks. Be sure to only translate what is in the quotation marks. For the purposes of this tutorial, we will just convert all letters to uppercase, so that the change is visible in the UI.
<!ENTITY cmd_engineManager.label "MANAGE SEARCH ENGINES..."><!ENTITY searchEndCap.label "SEARCH">
Save the file.
.properties Files
The property file "search.properties" contains the string "Add %S". This string can easily be found in the browser UI by visiting a website that provides a search plugin (like http://developer.mozilla.org/) and clicking on the drop-down arrow in the search box in the upper-right corner of your browser. At the second to bottom of the list of search engines that appears, you'll see, "Add %S", where %S is replaced by the name of the site.
Again, to start, make sure you are in
/path/to/your/working/directory/l10n-mozilla-1.9.2/x-testing
Now, step back out to the broader directory that contains both your l10n base (l10n-mozilla-1.9.2) and the en-US source code (mozilla-1.9.2). You can do this by typing:
cd ../../
where each ".." represents the prior sub directory before the main directory where you want to be. You can always check the path by typing
pwd
Once you are in the root working directory with both en-US source and the l10n base, copy the searchbar.dtd file by typing
cp mozilla-1.9.2/browser/locales/chrome/browser/search.properties l10n-mozilla-1.9.2/x-testing/browser/chrome/browser/
Open that file and translate the strings that follow the "=". For instance, enter the proper translation for the line "Add %S"
cmd_addFoundEngine=ADD "%S"
With these two string examples translated, you can now test your work to see immediately where you have translated. Refer to the Building and Testing section of the Create a new localization page.
Going one-by-one
With your compare-locales output open for review, we will start with the first file with "// add and localize this file" note. You should see
 // add and localize this file
        aboutCertError.dtd
Notice from the compare-locales output that this file is located in the directory /browser/chrome/browser. You will want to copy this file from the en-US sources into the proper ab-CD directory. To do this, you first need to create the directory structure and then copy the file into it. Type the command
pwd
Again, make sure you are in
/path/to/your/working/directory/l10n-mozilla-1.9.2/x-testing
And then type the command
mkdir /browser/chrome/browser
Now, copy the file by typing
cp mozilla-1.9.2/browser/locales/chrome/browser/aboutCertError.dtd l10n-mozilla-1.9.2/x-testing/browser/chrome/browser/aboutCertError.dtd
You should now see the aboutCertError.dtd file in that newly created directory. Your compare locales output follows the exact nested source structure. Each time you see a directory or set of sub-directories, you will need to run the mkdir command inside your locale directory and then copy the .dtd or .properties files into that directory.
Translating
To start editing, you will need a text editing application. You can choose to use:
(Read more about tools at L10n:Tools.)
After you have downloaded your editor of choice, type the following command in the same path from above (l10n-mozilla-1.9.2/x-testing/browser/chrome/browser)
$ edit l10n-mozilla-1.9.2/x-testing/browser/chrome/browser/aboutCertError.dtd
Read the top of the file to get any context on how to translate contained in the notes written by the developers or l10n-drivers. Localization notes will look like this:
<!-- LOCALIZATION NOTES... -->
After the localization notes, you will see a list of <!ENTITY> strings like the following:
<!ENTITY certerror.pagetitle "Untrusted Connection">
You should go through each entity, translating the value in the parameters (e.g. Untrusted Connection in the example above), like so (example for Polish):
<!ENTITY certerror.pagetitle "Niezaufane połączenie">
Once you have translated all the <!ENTITY> strings in this file, you should save your work and open the next .dtd or .properties file. You will need to go through each and every file to in every directory in the x-testing directory.
Recommended order of localization
For recommended order of localization, refer to the localization "phase list" which provides a very rough guide on where to start and in what order to proceed through translation.
- The localization phase lists (Firefox 3.5: ff35.phaselist, Firefox 3.6: ff36.phaselist).
- Description of phases.
Land your translated files one by one, making sure it follows the *mozilla-1.9.2* structure. This will familiarize you with our "Hg"
commands and will get us something that we can import easily when you are done.