
This article explains how you can use the <template> and <slot> elements to create a flexible template that can then be used to populate the shadow DOM of a web component.
The truth about templates
When you have to reuse the same markup structures repeatedly on a web page, it makes sense to use some kind of a template rather than repeating the same structure over and over again. This was possible before, but it is made a lot easier by the HTML <template> element (which is well-supported in modern browsers). This element and its contents are not rendered in the DOM, but it can still be referenced using JavaScript.
Let's look at a trivial quick example:
<template id="my-paragraph">
  <p>My paragraph</p>
</template>
This won't appear in your page until you grab a reference to it with JavaScript and then append it to the DOM, using something like the following:
let template = document.getElementById('my-paragraph');
let templateContent = template.content;
document.body.appendChild(templateContent);
Although trivial, you can already start to see how this could be useful.
Using templates with web components
Templates are useful on their own, but they work even better with web components. Let's define a web component that uses our template as the content of its shadow DOM. We'll call it <my-paragraph>:
customElements.define('my-paragraph',
  class extends HTMLElement {
    constructor() {
      super();
      let template = document.getElementById('my-paragraph');
      let templateContent = template.content;

      const shadowRoot = this.attachShadow({mode: 'open'})
        .appendChild(templateContent.cloneNode(true));
    }
  }
);
The key point to note here is that we append a clone of the template content to the shadow root, created using the Node.cloneNode() method.
And because we are appending its contents to a shadow DOM, we can include some styling information inside the template in a <style> element, which is then encapsulated inside the custom element. This wouldn't work if we just appended it to the standard DOM.
So for example:
<template id="my-paragraph">
  <style>
    p {
      color: white;
      background-color: #666;
      padding: 5px;
    }
  </style>
  <p>My paragraph</p>
</template>
Now we can use it by just adding it to our HTML document:
<my-paragraph></my-paragraph>
Note: Templates are well-supported in browsers; the Shadow DOM API is supported by default in Firefox (version 63 onwards), Chrome, Opera, Safari, and Edge (starting with version 79).
Adding flexibility with slots
So far so good, but the element isn't very flexible. We can only display one bit of text inside it, meaning that at the moment it is even less useful than a regular paragraph! We can make it possible to display different text in each element instance in a nice declarative way using the <slot> element. This has more limited support than <template>, available since Chrome 53, Opera 40, Safari 10, Firefox 59, and Edge 79.
Slots are identified by their name attribute, and allow you to define placeholders in your template that can be filled with any markup fragment you want when the element is used in the markup.
So, if we want to add a slot into our trivial example, we could update our template's paragraph element like this:
<p><slot name="my-text">My default text</slot></p>
If the slot's content isn't defined when the element is included in the markup, or if the browser doesn't support slots, <my-paragraph> just contains the fallback content "My default text".
To define the slot's content, we include an HTML structure inside the <my-paragraph> element with a slot attribute whose value is equal to the name of the slot we want it to fill. As before, this can be anything you like, for example:
<my-paragraph>
  <span slot="my-text">Let's have some different text!</span>
</my-paragraph>
or
<my-paragraph>
  <ul slot="my-text">
    <li>Let's have some different text!</li>
    <li>In a list!</li>
  </ul>
</my-paragraph>
Note: Elements that can be inserted into slots are known as Slotable; when an element has been inserted in a slot, it is said to be slotted.
Note: An unnamed <slot> will be filled with all of the custom element's top-level child nodes that do not have the slot attribute. This includes text nodes.
And that's it for our trivial example. If you want to play with it some more, you can find it on GitHub (see it running live also).
A more involved example
To finish off the article, let's look at something a little less trivial.
The following set of code snippets show how to use <slot> together with <template> and some JavaScript to:
- create a
<element-details>element with named slots in its shadow root - design the
<element-details>element in such a way that, when used in documents, it is rendered from composing the element’s content together with content from its shadow root—that is, pieces of the element’s content are used to fill in named slots in its shadow root
Note that it is technically possible to use <slot> element without a <template> element, e.g., within say a regular <div> element, and still take advantage of the place-holder features of <slot> for Shadow DOM content, and doing so may indeed avoid the small trouble of needing to first access the template element's content property (and clone it). However, it is generally more practical to add slots within a <template> element, since you are unlikely to need to define a pattern based on an already-rendered element.
In addition, even if it is not already rendered, the purpose of the container as a template should be more semantically clear when using the <template>. In addition, <template> can have items directly added to it, like <td>, which would disappear when added to a <div>.
Note: You can find this complete example at element-details (see it running live also).
Creating a template with some slots
First of all, we use the <slot> element within a <template> element to create a new "element-details-template" document fragment containing some named slots:
<template id="element-details-template">
<style>
details {font-family: "Open Sans Light",Helvetica,Arial}
.name {font-weight: bold; color: #217ac0; font-size: 120%}
h4 { margin: 10px 0 -8px 0; }
h4 span { background: #217ac0; padding: 2px 6px 2px 6px }
h4 span { border: 1px solid #cee9f9; border-radius: 4px }
h4 span { color: white }
.attributes { margin-left: 22px; font-size: 90% }
.attributes p { margin-left: 16px; font-style: italic }
</style>
<details>
<summary>
<span>
<code class="name"><<slot name="element-name">NEED NAME</slot>></code>
<i class="desc"><slot name="description">NEED DESCRIPTION</slot></i>
</span>
</summary>
<div class="attributes">
<h4><span>Attributes</span></h4>
<slot name="attributes"><p>None</p></slot>
</div>
</details>
<hr>
</template>
That <template> element has several features:
- The
<template>has a<style>element with a set of CSS styles that are scoped just to the document fragment the<template>creates. - The
<template>uses<slot>and itsnameattribute to make three named slots:<slot name="element-name"><slot name="description"><slot name="attributes">
- The
<template>wraps the named slots in a<details>element.
Creating a new <element-details> element from the <template>
Next, let’s create a new custom element named <element-details> and use Element.attachShadow to attach to it, as its shadow root, that document fragment we created with our <template> element above. This uses exactly the same pattern as we saw in our earlier trivial example.
customElements.define('element-details',
  class extends HTMLElement {
    constructor() {
      super();
      const template = document
        .getElementById('element-details-template')
        .content;
      const shadowRoot = this.attachShadow({mode: 'open'})
        .appendChild(template.cloneNode(true));
    }
  }
);
Using the <element-details> custom element with named slots
Now let’s take that <element-details> element and actually use it in our document:
<element-details>
  <span slot="element-name">slot</span>
  <span slot="description">A placeholder inside a web
    component that users can fill with their own markup,
    with the effect of composing different DOM trees
    together.</span>
  <dl slot="attributes">
    <dt>name</dt>
    <dd>The name of the slot.</dd>
  </dl>
</element-details>

<element-details>
  <span slot="element-name">template</span>
  <span slot="description">A mechanism for holding client-
    side content that is not to be rendered when a page is
    loaded but may subsequently be instantiated during
    runtime using JavaScript.</span>
</element-details>
About that snippet, notice these points:
- The snippet has two instances of
<element-details>elements which both use theslotattribute to reference the named slots"element-name"and"description"we put in the<element-details>shadow root . - Only the first of those two
<element-details>elements references the"attributes"named slot. The second<element-details>element lacks any reference to the"attributes"named slot. - The first
<element-details>element references the"attributes"named slot using a<dl>element with<dt>and<dd>children.
Adding a final bit of style
As a finishing touch, we'll add a tiny bit more CSS for the <dl>, <dt>, and <dd> elements in our doc:
  dl { margin-left: 6px; }
  dt { font-weight: bold; color: #217ac0; font-size: 110% }
  dt { font-family: Consolas, "Liberation Mono", Courier }
  dd { margin-left: 16px }
body { margin-top: 47px }
Result
Finally let’s put all the snippets together and see what the rendered result looks like.
| Screenshot | Live sample |
|---|---|
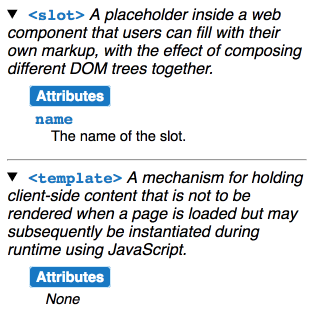 |
Notice the following points about this rendered result:
- Even though the instances of the
<element-details>element in the document do not directly use the<details>element, they get rendered using<details>because the shadow root causes them to get populated with that. - Within the rendered
<details>output, the content in the<element-details>elements fills the named slots from the shadow root. In other words, the DOM tree from the<element-details>elements get composed together with the content of the shadow root. - For both
<element-details>elements, an Attributes heading gets automatically added from the shadow root before the position of the"attributes"named slot. - Because the first
<element-details>has a<dl>element which explicitly references the"attributes"named slot from its shadow root, the contents of that<dl>replace the"attributes"named slot from the shadow root. - Because the second
<element-details>doesn’t explicitly reference the"attributes"named slot from its shadow root, its content for that named slot gets filled with the default content for it from the shadow root.
full example
<!DOCTYPE html>
<html>
<head>
<title>slot example</title>
<style>
dl { margin-left: 6px; }
dt { font-weight: bold; color: #217ac0; font-size: 110% }
dt { font-family: Consolas, "Liberation Mono", Courier }
dd { margin-left: 16px }
</style>
</head>
<body>
<template id="element-details-template">
<style>
details {font-family: "Open Sans Light",Helvetica,Arial}
.name {font-weight: bold; color: #217ac0; font-size: 120%}
h4 { margin: 10px 0 -8px 0; }
h4 span { background: #217ac0; padding: 2px 6px 2px 6px }
h4 span { border: 1px solid #cee9f9; border-radius: 4px }
h4 span { color: white }
.attributes { margin-left: 22px; font-size: 90% }
.attributes p { margin-left: 16px; font-style: italic }
</style>
<details>
<summary>
<span>
<code class="name"><<slot name="element-name">NEED NAME</slot>></code>
<i class="desc"><slot name="description">NEED DESCRIPTION</slot></i>
</span>
</summary>
<div class="attributes">
<h4><span>Attributes</span></h4>
<slot name="attributes"><p>None</p></slot>
</div>
</details>
<hr>
</template>
<element-details>
<span slot="element-name">slot</span>
<span slot="description">A placeholder inside a web
component that users can fill with their own markup,
with the effect of composing different DOM trees
together.</span>
<dl slot="attributes">
<dt>name</dt>
<dd>The name of the slot.</dd>
</dl>
</element-details>
<element-details>
<span slot="element-name">template</span>
<span slot="description">A mechanism for holding client-
side content that is not to be rendered when a page is
loaded but may subsequently be instantiated during
runtime using JavaScript.</span>
</element-details>
<script>
customElements.define('element-details',
class extends HTMLElement {
constructor() {
super();
const template = document
.getElementById('element-details-template')
.content;
const shadowRoot = this.attachShadow({mode: 'open'})
.appendChild(template.cloneNode(true));
}
})
</script>
</body>
</html>