
This page tells you step-by-step how to make a custom toolbar button in SeaMonkey 1.x. (For SeaMonkey 2, Firefox, Thunderbird and Sunbird, see the page: Custom Toolbar Button)
You do not need any special technical skills or tools, and almost all the information you need is on this page.
Introduction
The technique described here does not involve any hacking. Instead, you make your custom button as a self-contained extension.
You can use the sample code provided here to make buttons that do various useful things. If you know how to program in JavaScript, then you can write your own code that does other things.
You can use this page if all you really want is a button for some special purpose.
You can also use this page to learn about extensions, and as a starting point if you plan to write a more complex extension. Note that this extension is very simplified. Use other tutorials and articles to find out more—the main Extensions page here is a good starting point. In particular, the articles Creating toolbar buttons and Building an Extension explain the process in more detail.
Supported applications
You can use the steps on this page only with SeaMonkey 1.x versions. SeaMonkey 2 is being reworked to support the same process as Firefox, Thunderbird and others.
This tutorial adds a customizable button to all SeaMonkey's toolbars. It adds a menu choice to ChatZilla's menu bar (because ChatZilla has no toolbar).
Note: For a similar tutorial that applies to SeaMonkey 2, Firefox, Thunderbird and Sunbird, see: Custom Toolbar Button
Earlier versions and other Mozilla applications also support extensions, but some parts of this tutorial are not appropriate for them.
Required tools
You will need two tools. Your operating system normally provides them:
- A way to create and work with files and directories
- A text editor for plain text files
Character encoding
Some text editors have a setting for character encoding.
If your language uses only plain Latin (ASCII) characters, set your text editor to use any encoding except Unicode.
If your language uses accents or other non-Latin characters, set your text editor to save files using the UTF-8 encoding.
To check your text editor, create a plain text file named test.txt. In the file, type some of the special characters that your language uses. Save the file.
Open the file in SeaMonkey (for example, by dragging it and dropping it in the Navigator window, or by choosing File – Open File... from SeaMonkey's menu bar).
From SeaMonkey's menu bar, choose View – Character Encoding – Unicode (UTF-8). Check that the text you typed looks OK with this setting.
If your text editor does not support UTF-8, search the Internet for a better one that you can download.
Optional tools
You can optionally use any image editor to customize the images.
You can optionally use a jar tool or zip tool to package your button as a cross-platform installable (XPI) for other people to install and use.
Making a button
There are nine easy steps.
When you have completed all the steps, you will have a structure like this in the directory where you installed SeaMonkey:
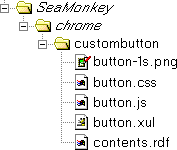
chrome directory there.
Note: For information about how to find the directory where you installed SeaMonkey, see: Installation directory
If you cannot easily find the directory, you can use the following method to find it. From SeaMonkey's menu bar, choose Tools – Web Development – JavaScript Console. Copy the following code. It is one very long line ending in path—make sure that you get all of it:
Components.classes["@mozilla.org/file/directory_service;1"].getService( Components.interfaces.nsIProperties).get("AChrom", Components.interfaces.nsIFile).path
In the JavaScript Console window, paste the code in the field near the top. Presss the Return or Enter key, or the Evaluate button. The console displays the location of SeaMonkey's chrome directory.
Explanation: The chrome directory contains program files that are part of SeaMonkey itself, together with other files that are provided by extensions. Your toolbar button will be an extension.
-
chrome.rdf
overlays.rdf
Explanation: SeaMonkey automatically rebuilds these files the next time it starts. When it rebuilds them, it will include your new extension.
installed-chrome.txt
At the end of the file, add the following line. Copy and paste the line from here, to avoid typing errors:
-
content,install,url,resource:/chrome/custombutton/
Explanation: This line registers your custom toolbar button extension, linking it into SeaMonkey.
-
custombutton
Perform the following steps in this new directory, creating five files there.
Explanation: The name is a unique identifier for your extension, and the directory will contain all your extension's files.
contents.rdf.
Copy the following content, making sure that you scroll to get all of it. Paste it into the new file:
<?xml version="1.0" encoding="UTF-8"?>

<!DOCTYPE RDF:RDF>

<RDF:RDF xmlns:RDF="http://www.w3.org/1999/02/22-rdf-syntax-ns#"
         xmlns:chrome="http://www.mozilla.org/rdf/chrome#">

  <RDF:Seq RDF:about="urn:mozilla:package:root">
      <RDF:li RDF:resource="urn:mozilla:package:custombutton"/>
  </RDF:Seq>

  <RDF:Description RDF:about="urn:mozilla:package:custombutton"

    chrome:displayName="Custom Button"
    chrome:description="My custom toolbar button"
    chrome:author="My name"

    chrome:name="custombutton"
    chrome:localeVersion="1.8"
    chrome:skinVersion="1.5"
    chrome:extension="true"/>

  <RDF:Seq about="urn:mozilla:overlays">

    <!-- browser -->
    <RDF:li>
      <RDF:Seq about="chrome://navigator/content/navigator.xul">
        <RDF:li>chrome://custombutton/content/button.xul</RDF:li>
      </RDF:Seq>
    </RDF:li>

    <!-- address book -->
    <RDF:li>
      <RDF:Seq about="chrome://messenger/content/addressbook/addressbook.xul">
        <RDF:li>chrome://custombutton/content/button.xul</RDF:li>
      </RDF:Seq>
    </RDF:li>

    <!-- message -->
    <RDF:li>
      <RDF:Seq about="chrome://messenger/content/messageWindow.xul">
        <RDF:li>chrome://custombutton/content/button.xul</RDF:li>
      </RDF:Seq>
    </RDF:li>

    <!-- message compose -->
    <RDF:li>
      <RDF:Seq about="chrome://messenger/content/messengercompose/messengercompose.xul">
        <RDF:li>chrome://custombutton/content/button.xul</RDF:li>
      </RDF:Seq>
    </RDF:li>

    <!-- mail -->
    <RDF:li>
      <RDF:Seq about="chrome://messenger/content/messenger.xul">
        <RDF:li>chrome://custombutton/content/button.xul</RDF:li>
      </RDF:Seq>
    </RDF:li>

    <!-- composer -->
    <RDF:li>
      <RDF:Seq about="chrome://editor/content/editor.xul">
        <RDF:li>chrome://custombutton/content/button.xul</RDF:li>
      </RDF:Seq>
    </RDF:li>

    <!-- chat -->
    <RDF:li>
      <RDF:Seq about="chrome://chatzilla/content/chatzilla.xul">
        <RDF:li>chrome://custombutton/content/button.xul</RDF:li>
      </RDF:Seq>
    </RDF:li>

    <!-- calendar -->
    <RDF:li>
      <RDF:Seq about="chrome://calendar/content/calendar.xul">
        <RDF:li>chrome://custombutton/content/button.xul</RDF:li>
      </RDF:Seq>
    </RDF:li>

  </RDF:Seq>
</RDF:RDF>
Optionally customize the file by changing the displayName, description and author attributes. Change the text between double-quote characters on those three lines.
Optionally remove the sections for toolbars where you do not want your button.
Save the file.
Explanation: This file contains details of your extension, and specifies how it modifies SeaMonkey.
button.xul.
Copy the following content, making sure that you scroll to get all of it. Paste it into the new file:
<?xml version="1.0" encoding="UTF-8"?>
<?xml-stylesheet type="text/css"
  href="chrome://custombutton/content/button.css"?>

<!DOCTYPE overlay >
<overlay id="custombutton-overlay"
  xmlns="http://www.mozilla.org/keymaster/gatekeeper/there.is.only.xul">

<script type="application/javascript"
  src="chrome://custombutton/content/button.js"/>

<!-- browser -->
<toolbar id="nav-bar">
  <hbox id="nav-bar-buttons">
    <toolbarbutton id="custom-button-1"/>
    </hbox>
  </toolbar>

<!-- address book -->
<toolbar id="abToolbar">
  <hbox id="toolbar_button_box">
    <toolbarbutton id="custom-button-1" position="8"/>
    </hbox>
  </toolbar>

<!-- message compose -->
<toolbar id="composeToolbar">
  <hbox id="toolbar_button_box">
    <toolbarbutton id="custom-button-1" position="8"/>
    </hbox>
  </toolbar>

<!-- mail, message -->
<hbox id="toolbar_button_box">
  <toolbarbutton id="custom-button-1" position="15"/>
  </hbox>

<!-- composer -->
<toolbar id="EditToolbar">
  <toolbarbutton id="custom-button-1" position="18"/>
  </toolbar>

<!-- chat -->
<menubar id="mainmenu">
  <menu id="custom-menu" position="4" label="Custom" accesskey="C">
    <menupopup>
      <menuitem id="custom-item-1"
        label="Custom Item 1"
        accesskey="1"
        tooltiptext="My custom menu item"
        oncommand="CustomButton[1]()"
        />
      </menupopup>
    </menu>
  </menubar>

<!-- calendar -->
<toolbar id="calendar-bar">
  <toolbarbutton id="custom-button-1" position="10"/>
  </toolbar>

<!-- button details -->
<toolbarbutton id="custom-button-1"
  label="Custom"
  tooltiptext="My custom toolbar button"
  oncommand="CustomButton[1]()"
  class="toolbarbutton-1 custombutton"
  />

</overlay>
Optionally customize the file by changing the label, accesskey and tooltiptext attributes. Change the text between double-quote characters on those lines.
Optionally remove the sections for toolbars that you do not need.
Save the file.
Explanation: This XUL file adds the button to the toolbars. It also links to the stylesheet and JavaScript code that the button uses. The last section specifies details of the button.
button.css.
Copy the following content, making sure that you scroll to get all of it. Paste it into the new file:
#custom-button-1
  {list-style-image: url("chrome://custombutton/content/button-1s.png");}

/* common style for all custom buttons - modern */
#nav-bar .custombutton
  {-moz-image-region: rect( 0px  41px 39px  0px);}
#nav-bar .custombutton:hover
  {-moz-image-region: rect( 0px  83px 39px 42px);}
#nav-bar .custombutton:active
  {-moz-image-region: rect( 0px 125px 39px 84px);}

.custombutton
  {-moz-image-region: rect(39px  49px 72px  0px);}
.custombutton:hover
  {-moz-image-region: rect(39px  98px 72px 49px);}
.custombutton:active
  {-moz-image-region: rect(39px 147px 72px 98px);}

/* common style for all custom buttons - classic */
.custombutton
  {-moz-image-region: rect( 0px 145px 20px 126px);}
.custombutton:hover
  {-moz-image-region: rect( 0px 164px 20px 145px);}
.custombutton:active
  {-moz-image-region: rect( 0px 183px 20px 164px);}
Remove one of the common style sections, leaving the section for the theme that you use in SeaMonkey. (If you leave both sections in the file, then your button's appearance will match the classic theme.)
Save the file.
Explanation: This CSS stylesheet specifies how the button is diaplayed. It links to the button image, specifying the dimensions of the six parts of the image.
button.js.
Copy the following content, and paste it into the new file:
CustomButton = {

1: function () {
  alert("Just testing")
  },

}
There is nothing to customize for now. Save the file.
The next section in this tutorial contains examples of code that you can use to make your button do something useful.
Explanation: This file specifies what happens when you press the button. It uses the JavaScript programming language, together with features provided by the application.
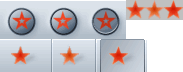
Get a context menu for the image that you see here (for example, by right-clicking it). Choose Save Image As... from the context menu, and save it in the same custombutton directory as the files you have just created. Ensure that the name of the saved file is: button-1s.png
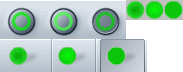
Explanation: The image is in nine parts. The six parts at the left are for SeaMonkey's modern theme, and the three parts at the right are for its classic theme. Lighter images are used when the mouse pointer is over the button. Darker images are used when the button is pressed.
Testing your new button
Restart SeaMonkey.
Click the button to test it. You should see the pop-up message.
Further development
This section describes how you can develop your button further.
Uninstalling the button
If you ever want to uninstall the button, delete the files chrome.rdf and overlays.rdf again, just as you did in step 2.
Remove the line that you added to installed-chrome.txt in step 3.
Delete the custombutton directory that you created in step 4.
Restart SeaMonkey.
Troubleshooting
If the button does not appear, or if you find some other problem, check that you have followed all the steps exactly.
If necessary, uninstall the button and start again, this time without making any changes to the files.
After you get the button working, customize the files carefully.
To see the effect of any change that you make, restart SeaMonkey.
Advanced troubleshooting
If you have some technical knowledge, then you can use the SeaMonkey's JavaScript console to see error messages. However, you might see messages that are unhelpful or confusing, or that come from other parts of the application.
To open the JavaScript console, choose Tools – Web Development – JavaScript Console.
Messages in the JavaScript console can provide information about JavaScript, XUL or CSS files.
Programming the button
To make your button do something useful, edit the file button.js that you created in step 8.
Remove the line: alert("Just testing") and replace it with JavaScript code that does whatever you want to do.
For a selection of code samples that you can copy and paste, and customize without any knowledge of programming, see this page: Code Samples
Your changes take effect when you restart the application.
Adding more buttons
To add another button, edit button.xul. For each toolbar, duplicate the line that specifies custom-button-1, change the new line to specify custom-button-2, and change its position attribute to position the new button in the toolbar.
Duplicate the last section. In the id and oncommand attributes, change 1 to 2. Change the label, accesskey and tooltiptext attributes to whatever you want. Do not change the class attribute.
Now edit button.css. Duplicate the first two lines, changing the new lines to specify button-2.
Edit button.js and add JavaScript code for the new button. Be sure to add the extra code before the curly brace on the last line of the file. For example, you could add this code for testing:
2: function () {
  alert("Just testing again")
  },
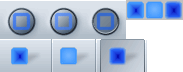
Create an image for the new button, naming the file button-2s.png. The images supplied here have a 256-colour palette and a transparent background. They are in PNG format. Some other formats will also work.
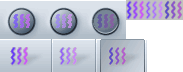
Here are some more images that you can download and use:

Restart the application to find the new button.
You can repeat these steps to add as many buttons as you need.
Positioning buttons
To position your buttons on each toolbar, you can use their position attributes in button.xul. You might have to use trial and error to find values that work well, and you might find that not all positions are possible using this technique.
This simplfied tutorial handles all the toolbars in a single file, button.xul. This is not always satisfactory.
If you find that settings for different toolbars interfere with each other, make a separate XUL file for each toolbar by copying button.xul and removing that parts that you do not need.
Change contents.rdf, replacing each occurrence of button.xul with the name of one of your new XUL files. After changing contents.rdf, delete the files chrome.rdf and overlays.rdf so that SeaMonkey registers the change the next time it starts.
Distributing your button to other users
If you want to distribute your button or buttons to other users, you must first make some changes to avoid conflicts when they install your extension. You will need a jar tool or zip tool to package your extension.
There are six steps.
Use this name to replace the text custombutton, custom-button and CustomButton in all four text files:
-
button.css

      button.js

      button.xul

      contents.rdf
In contents.rdf, also change the displayName, description and author attributes.
Use any name that you like for this directory.
install.js
Copy the following content, and paste it into the new file:
const title = "Custom Toolbar Button"
const name = "custombutton"
const version = "1.0"

r = initInstall(title, name, version)
  || addDirectory(null, "content", getFolder("Chrome"), name)
  || registerChrome(CONTENT + DELAYED_CHROME, getFolder("Chrome", name), "")

if (r) cancelInstall(r)
else performInstall(), alert("Now restart SeaMonkey")
Customize the title, name and (optionally) version definitions, changing the text between double-quote characters on those three lines. The name must match the change that you made in step 1.
content.
Move all the files from your original custombutton directory into your new content directory.
(For instructions, see the section Uninstalling the button, above.)
Name the package file with the .xpi extension. (Some zip tools require you to use the .zip extension first, then rename the file to change the extension.)
Ensure that the package does not contain your working directory itself, but only install.js, content and all the files in content.
To install the packaged extension, open the XPI file in SeaMonkey. (For example, drag the file's icon and drop it in SeaMonkey, or choose File – Open File... from the menu bar.)
Distribute the XPI file to other users.
Alternate "Quick and Dirty" method for hooking up a single preexisting XUL file to display in SeaMonkey:
As described above, find the SeaMonkey\chrome folder. Create a subfolder (eg. SeaMonkey\chrome\myapp) and open it, placing your XUL file within. Now open a new text document in the same folder, pasting the following text within:
<?xml version="1.0" encoding="UTF-8"?>
<!DOCTYPE RDF:RDF>
<RDF:RDF xmlns:RDF="http://www.w3.org/1999/02/22-rdf-syntax-ns#"
xmlns:chrome="http://www.mozilla.org/rdf/chrome#">
<RDF:Seq RDF:about="urn:mozilla:package:root">
<RDF:li RDF:resource="urn:mozilla:package:myapp"/>
</RDF:Seq>
<RDF:Description RDF:about="urn:mozilla:package:myapp"
chrome:displayName="MyApp"
chrome:description="My first XUL App"
chrome:author="Yours Truly"
chrome:name="MyApp"
chrome:localeVersion="1.8"
chrome:skinVersion="1.5"
chrome:extension="true"/>
</RDF:RDF>
Replace the fields in bold with your XUL file name and change the displayName, description, and author attributes as suits you.
Save the file as contents.rdf and navigate to SeaMonkey\chrome again, following steps 2 and 3 as listed above. Restart SeaMonkey and type the chrome url: chrome://myapp/content/myapp.xul, the browser should show you the content of the XUL file. Note: You may have to restart the machine, as SeaMonkey often is configured to keep portions of code in memory.
This may not be the most relevant spot for this addition, I posted this here because the above approach proved successful after hours of unsuccessful tinkering with methods that proved to be obsolete or broken for various reasons.