
This tutorial walks through creating a simple add-on using the cfx command-line tool.
cfx has been deprecated and you should use jpm instead. Use cfx only if you need to work with Firefox 38 or earlier. See:
Prerequisites
To create add-ons for Firefox using the SDK, you'll first need to follow the instructions to install and activate the SDK. Once you've done that, you'll be looking at a command prompt.
Initializing an empty add-on
In the command prompt, create a new directory. The directory doesn't have to be under the SDK root: you can create it anywhere you like. Navigate to it, type cfx init, and hit enter:
mkdir my-addon
cd my-addon
cfx init
You'll see some output like this:
* lib directory created
* data directory created
* test directory created
* doc directory created
* README.md written
* package.json written
* test/test-main.js written
* lib/main.js written
* doc/main.md written
Your sample add-on is now ready for testing:
try "cfx test" and then "cfx run". Have fun!"
Implementing the add-on
Now you can write the add-on's code, which goes in the "main.js" file in your "lib" directory. This file was created for you in the previous step. Open it and add the following code:
var buttons = require('sdk/ui/button/action');
var tabs = require("sdk/tabs");

var button = buttons.ActionButton({
  id: "mozilla-link",
  label: "Visit Mozilla",
  icon: {
    "16": "./icon-16.png",
    "32": "./icon-32.png",
    "64": "./icon-64.png"
  },
  onClick: handleClick
});

function handleClick(state) {
  tabs.open("https://www.mozilla.org/");
}
Save the file.
Next, save these three icon files to the "data" directory:
 |
icon-16.png |
 |
icon-32.png |
 |
icon-64.png |
Back at the command prompt, type:
cfx run
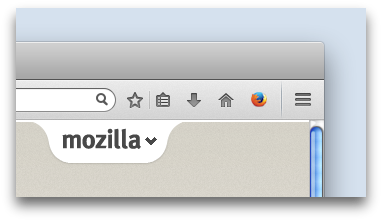
This is the SDK command to run a new instance of Firefox with your add-on installed. When Firefox launches, in the top-right corner of the browser you'll see an icon with the Firefox logo. Click the icon, and a new tab will open with https://www.mozilla.org/ loaded into it.
That's all this add-on does. It uses two SDK modules: the action button module, which enables you to add buttons to the browser, and the tabs module, which enables you to perform basic operations with tabs. In this case, we've created a button whose icon is the Firefox icon, and added a click handler that loads the Mozilla home page in a new tab.
 Try editing this file. For example, we could change the page that gets loaded:
var buttons = require('sdk/ui/button/action');
var tabs = require("sdk/tabs");

var button = buttons.ActionButton({
  id: "mozilla-link",
  label: "Visit Mozilla",
  icon: {
    "16": "./icon-16.png",
    "32": "./icon-32.png",
    "64": "./icon-64.png"
  },
  onClick: handleClick
});

function handleClick(state) {
  tabs.open("https://developer.mozilla.org/");
}
At the command prompt, execute cfx run again. This time clicking it takes you to https://developer.mozilla.org/.
Packaging the add-on
When you've finished the add-on and are ready to distribute it, you'll need to package it as an XPI file. This is the installable file format for Firefox add-ons. You can distribute XPI files yourself or publish them to https://addons.mozilla.org so other users can download and install them.
To build an XPI, just execute the command cfx xpi from the add-on's directory:
cfx xpi
You should see a message like:
Exporting extension to my-addon.xpi.
To test that this worked, try installing the XPI file in your own Firefox installation. You can do this by pressing the Ctrl+O key combination (Cmd+O on Mac) from within Firefox, or selecting the "Open" item from Firefox's "File" menu. This will bring up a file selection dialog; navigate to the "my-addon.xpi" file, open it and follow the prompts to install the add-on.
Summary
In this tutorial we've built and packaged an add-on using three commands:
cfx initto initialize an empty add-on templatecfx runto run a new instance of Firefox with the add-on installed, so we can try it outcfx xpito package the add-on into an XPI file for distribution
These are the three main commands you'll use when developing SDK add-ons. There's comprehensive reference documentation covering all the commands you can use and all the options they take.
The add-on code itself uses two SDK modules, action button and tabs. There's reference documentation for all the high-level and low-level APIs in the SDK.
What's next?
To get a feel for some of the things you can do with the SDK APIs, try working through some of the tutorials.
Advanced techniques
Overriding the built-in modules
The SDK modules you use to implement your add-on are built into Firefox. When you run or package an add-on using cfx run or cfx xpi, the add-on will use the versions of the modules in the version of Firefox that hosts it.
As an add-on developer, this is usually what you want. But if you're developing the SDK modules themselves, of course, it isn't. In this case it's assumed that you have checked out the SDK from its GitHub repo and will have run the bin/activate script from the root of your checkout.
Then when you invoke cfx run or cfx xpi, you pass the "-o" option:
cfx run -o
This instructs cfx to use the local copies of the SDK modules, not the ones in Firefox.
Developing without cfx run
Because cfx run restarts the browser each time you invoke it, it can be a little cumbersome if you are making frequent changes to an add-on. An alternative development model is to use the Extension Auto-Installer add-on: this listens for new XPI files on a specified port and installs them automatically. That way you can test new changes without needing to restart the browser:
- make a change to your add-on
- run cfx xpi
- post the add-on to the port specified
You could even automate this workflow with a simple script. For example:
while true ; do cfx xpi ; wget --post-file=codesy.xpi http://localhost:8888/ ; sleep 5 ; done
Note that the logging level defined for the console is different when you use this method, compared to the logging level used when an add-on is run using cfx run. This means that if you want to see output from console.log() messages, you'll have to tweak a setting. See the documentation on logging levels for the details on this.
Another example using grunt and grunt-shell:
module.exports = function(grunt) {
  'use strict';
  require('matchdep').filterDev('grunt-!(cli)').forEach(grunt.loadNpmTasks);
  grunt.initConfig({
    shell: {
      xpi: {
        command: [
          'cd pluginpath',
          'cfx xpi',
          'wget --post-file=pluginname.xpi http://localhost:8888/ || echo>/dev/null'
        ].join('&&')
      }
    },
    watch: {
      xpi: {
        files: ['pluginpath/**'],
        tasks: ['shell:xpi']
      }
    }
  });

  grunt.loadNpmTasks('grunt-contrib-watch');
  grunt.loadNpmTasks('grunt-shell');
  grunt.registerTask('default', ['watch']);
};