
Our final article provides you with a list of React resources that you can use to go further in your learning.
| Prerequisites: |
Familiarity with the core HTML, CSS, and JavaScript languages, knowledge of the terminal/command line. |
|---|---|
| Objective: | To provide further resources for learning more about React. |
Component-level styles
Although this tutorial doesn't use this approach, many React applications define their styles on a per-component basis, rather than in a single, monolithic stylesheet.
create-react-app makes it possible to import CSS files into JavaScript modules, so that CSS is only sent to your user when the corresponding component is rendered. For this app, we could have for example written a dedicated Form.css file to house the styles of those respective components, then imported the styles into their respective modules like this:
import Form from './Form';
import './Form.css'
This approach makes it easy to identify and manage the CSS that belongs to a specific component. However, it also fragments your stylesheet across your codebase, and this fragmentation might not be worthwhile. For larger applications with hundreds of unique views and lots of moving parts, it makes sense to limit the amount of irrelevant code that's sent to your user. You'll likely have app-wide styles and specific component styles that built on top of those.
You can read more about component stylesheets in the create-react-app docs.
React DevTools
We used console.log() to check on the state and props of our application in this tutorial, and you'll also have seen some of the useful warnings and error message that react gives you both in the CLI and your browser's JavaScript console. But there's more we can do here.
The React DevTools utility allows you to inspect the internals of your React application directly in the browser. It adds a new panel to your browser's developer tools, and with it you can inspect the state and props of various components, and even edit state and props to make immediate changes to your application.
This screenshot shows our finished application as it appears in React DevTools:
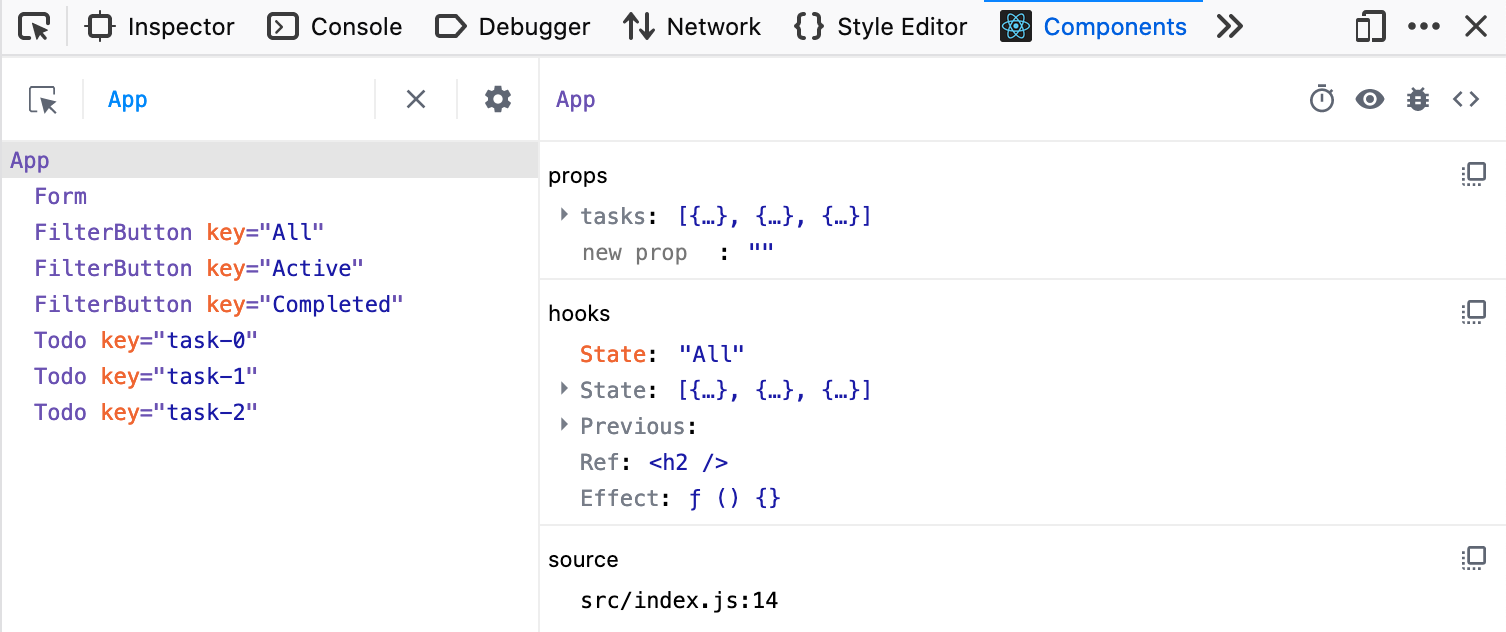
On the left, we see all of the components that make up our application, including some unique keys for the things that are rendered from arrays. On the right, we see the props and hooks that our App component utilizes. Notice, too, that the Form, FilterButton, and Todo components are indented to the right – this indicates that App is their parent. In more complex apps, this view is great for understanding parent/child relationships at a glance.
React DevTools is available in a number of forms:
- A Chrome browser extension.
- A Firefox browser extension.
- A Chromium Edge browser extension (available soon).
- A stand-alone application you can install with NPM or Yarn.
Try installing one of these, then using it to inspect the app you’ve just built!
You can read more about React DevTools on the React blog.
The Context API
The application that we built in this tutorial utilized component props to pass data from its App component to the child components that needed it. Most of the time, props are an appropriate method for sharing data; for complex, deeply nested applications, however, they're not always best.
React provides the Context API as a way to provide data to components that need it without passing props down the component tree. There's also a useContext hook that facilitates this.
If you'd like to try this API for yourself, Smashing Magazine has written an introductory article about React context.
Class components
Although this tutorial doesn’t mention them, it is possible to build React components using ES6 classes – these are called class components. Until the arrival of hooks, ES6 classes were the only way to bring state into components or manage rendering side effects. They're still the only way to handle certain other, more edge-case features, and they’re very common in legacy React projects. The official React docs are a great place to start learning about them.
- State and Lifecycle in the React Docs
- Intro To React in the React Docs
- Read about JavaScript classes at MDN
Testing
create-react-app provides some tools for testing your application out of the box — you may have deleted the relevant files earlier in the tutorial. The documentation for create-react-app covers some basics for testing.
Routing
While routing is traditionally handled by a server and not an application on the user's computer, it is possible to configure a web application to read and update the browser's location, and render certain user interfaces. This is called client-side routing. It's possible to create many unique routes for your application (such as /home, /dashboard, or login/).
The React community has produced two major libraries for client-side routing: React Router and Reach Router.
- React Router is well-suited to applications with complex routing needs, and it meets some edge cases better than Reach Router. React Router is a larger library, however.
- Reach Router is well-suited to simpler applications, and automatically manages focus as the user navigates from page to page.
Focus management is essential in client-side routing — without it, keyboard users can be trapped in focus limbo, and screen-reader users may have no idea that they have moved to a new page. Because Reach Router is better for accessibility, it's a good place to start.
There's one caveat, however: these projects will be merging in the near future. When this merge happens, React Router will be the surviving project (with the addition of the focus management features of Reach).
In this module
- Introduction to client-side frameworks
- Framework main features
- React
- Ember
- Vue
- Getting started with Vue
- Creating our first Vue component
- Rendering a list of Vue components
- Adding a new todo form: Vue events, methods, and models
- Styling Vue components with CSS
- Using Vue computed properties
- Vue conditional rendering: editing existing todos
- Focus management with Vue refs
- Vue resources
- Svelte